Create a pure Python package#
About this lesson
This lesson uses the pyOpenSci Python package copier template to create a Python package quickly. Your package will be installable both locally and remotely from a website such as GitHub (or GitLab) into a Python environment.
In this lesson, you will learn:
How to make your code installable into any Python environment, both locally and from GitHub
How to update a pyproject.toml file, which contains the metadata needed to build, install, and publish your package.
How to declare a Build backend which will be used to build and install your package
How to install your package in editable mode for interactive development
What you need to complete this lesson
To complete this lesson, you will need a local Python environment and shell on your computer. You will need to have Copier and Hatch installed to complete the lesson successfully.
If you are using Windows or are not familiar with Shell, you may want to check out the Carpentries shell lesson[1]. Windows users will likely need to configure a tool such as gitbash for any Shell and git-related steps.
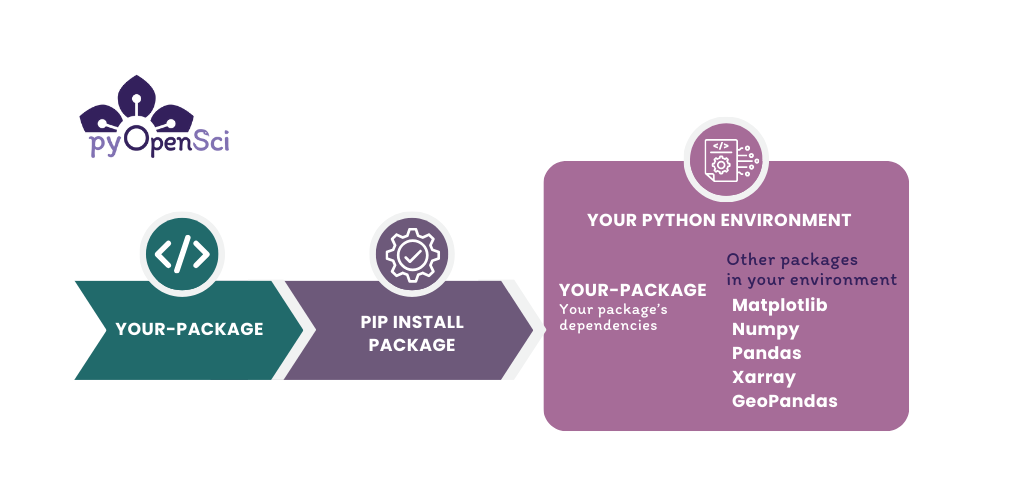
In a previous lesson, you learned what a Python package is. Creating a Python package allows you to install your code into any Python environment on your computer. You can then import it into workflows in the same way that you might import a package such as Pandas or GeoPandas. If you push your code to GitHub or GitLab, you can also install it directly from there. Scroll to the bottom of the page to learn more about the basic elements of a Python package..#
Create your Python package#
Below, you will create a pure Python package using the pyOpenSci copier template. Our template uses Hatch as the default packaging tool. At the bottom of this lesson, you’ll learn more about the basics of the Python package directory structure, and associated key files (__init__.py and pyproject.toml).
Step 1: Set Up the Package Directory Structure#
Open your shell or preferred terminal.
Use the shell
cdcommand to navigate in your shell to the location where you’d like your package to live. Our template will create the package directory structure for youChoose a name for your package. The name should:
Have no spaces (Required)
Use all lowercase characters (Recommended). For this tutorial, we will use
pyospackage.Only use letters and the characters _ or - in the name. This means that the name
pyos*packageis not an acceptable name. However, the namespyos_packageorpyos-packageare both OK.
In your terminal, run the command below. This will begin a series of prompts that will ask you questions and help you to customize your Python package.
copier copy gh:pyopensci/pyos-package-template .
After running the command above, the template will walk you through a series of questions.
Note that when you reach the prompt “Do you want to answer one more question, and skip the rest, using the default values?” you can choose Yes, but with a minimal setup to create the most basic version of your package that contains documentation, tests and a example module for you to use.
After this question, the template will ask you for your preferred GitHub username and will then create a package with basic tests, documentation, and GitHub configuration setup for you.
➜ copier copy gh:pyopensci/pyos-package-template .
🎤 "Welcome to the pyOpenSci package template.
Please select the type of template that you want to create today."
 >> MINIMAL: I want a minimal setup (package, tests and docs; typing); linting not included).
    FULL DEFAULT: I want to use the default settings but I want it setup for me.
    FULL CUSTOM: I want it all but I want to fully customize all template elements.
🎤 What is the name of the project? Used as the README.md title, in the
   pyospackage_juno
🎤 Please provide a short description for the package.
    (Finish with 'Alt+Enter' or 'Esc then Enter')
> A great package that adds and subtracts numbers.
🎤 Who is the author of the package? Used in the package description.
   juno dawg
🎤 Provide you or your organization's GitHub username. Used to generate
   pyopensci
The template will then begin to copy files into the directory that used above. (. means current working directory.)
...Copying from template version 0.6.4.1
    create  CODE_OF_CONDUCT.md
    ...The template will continue to copy files...
The final package structure will look like this:
└── .github/ # a hidden directory with templates for github and actions to run your tests
├── CHANGELOG.md
├── CODE_OF_CONDUCT.md
├── CONTRIBUTING.md
├── LICENSE
├── README.md
├── pyproject.toml
└── src/  # This is your package directory where your code lives
└── docs/ # this is where your documentation lives
└── tests/ # Your tests are here
Step 2: Explore the existing module in your package#
A Module refers to a .py file containing the code that you want your
package to access and run. Within the pyospackage subdirectory, you have an
example.py module that you can use to test out your package quickly.
Notice that the code in the example.py module, has a few features:
It has a numpy-style docstring
It uses typing
At the top of the module, there is a docstring explaining what the module does.
Python supports different docstring formats. The most popular formats for documenting Python objects are NumPy Style Docstring[2], Google Style Docstring[3], and the Epytext Style Docstrings[4].
pyOpenSci recommends using the NumPy Docstring convention.
Learn more about docstrings here for an overview of both topics.
def add_num(a: int, b: int) -> int:
    """
    Add two numbers.

    Parameters
    ----------
    a : int
        The first number to be added.
    b : int
        The second number to be added.

    Returns
    -------
    int
        The sum of the two input numbers (a + b).

    Examples
    --------
    >>> add_num(3, 5)
    8
    >>> add_num(-2, 7)
    5
    """
    return a + b
Python modules and the __init__.py file
The word module refers to a .py file containing Python code.
The __init__.py allows Python to recognize that a directory contains at least one module that may be imported and used in your code.
A package can have multiple modules[5].
Step 3: Optional – Add code to your module#
If you want, add a second function to the example.py module. It can be a simple function.
For example, write a second function that multiplies numbers.
Step 4: Check out the metadata in your pyproject.toml file#
A pyproject.toml file stores metadata that provides instructions to various tools interacting with it, including Hatch, which will build your package. You can also specify metadata for your package.
You will learn more about the pyproject.toml format in the
next lesson when you add additional metadata/information to this file.
The metadata in your generated pyproject.toml is already setup for you using the information you provided the copier template above.
Brief overview of the TOML file
The TOML format consists of tables and variables. Tables are sections of information denoted by square brackets:
[this-is-a-table].
Tables can contain variables within them defined by a variable name and an = sign.
For instance, a build-system table most often holds two (2) variables:
requires =, which tells a build tool what tools it needs to install prior to building your package. In this case hatchling.build-backend =, which is used to define the specific build-backend name, (in this example we are usinghatchling.build).
# An example of the build-system table which contains two variables - requires and build-backend
[build-system]
requires = ["hatchling"]
build-backend = "hatchling.build"
TOML organizes data structures, defining relationships within a configuration file.
Open up the
pyproject.tomlfile that Hatch created in your favorite text editor. It should look something like the example below.Make sure the package version, package name, and author name look correct. The email is optional.
[project]
name = "pyospackage"
version = "0.1.0"
description = "A small template package that does cool things."
authors = [
    { name = "pyOpenSci", email = "pyopensci@pyopensci.org" },
]
license = "MIT"
readme = {"file" = "README.md", "content-type" = "text/markdown"}
# Please consult https://pypi.org/classifiers/ for a full list.
classifiers = [
    "Development Status :: 2 - Pre-Alpha",
    "Intended Audience :: Science/Research",
    "Operating System :: OS Independent",
    "Programming Language :: Python :: 3 :: Only",
]
# TODO: add keywords
keywords = []
# TODO: add dependencies
dependencies = []

[project.urls]
Homepage = "https://github.com/pyopensci/pyospackage"
"Source Code" = "https://github.com/pyopensci/pyospackage"
"Bug Tracker" = "https://github.com/pyopensci/pyospackage/issues"
Documentation = "https://pyospackage.readthedocs.io"
Download = "https://pypi.org/project/pyospackage/#files"

[project.optional-dependencies]
dev = [
    "hatch",
    "pre-commit",
]
At the bottom of the template-generated pyproject.toml file, you will see a section that defines Hatch environments. We will cover Hatch environments in a later lesson.
The bare minimum needed in a pyproject.toml file
The core information that you need in a pyproject.toml file to publish on PyPI is your package’s name and the version. However, we suggest that you flesh out your metadata early on in the pyproject.toml file.
Once you have your project metadata in the pyproject.toml file, you will
rarely update it.
Step 5: Install your package locally#
At this point, you should have:
A project directory structure with a
pyproject.tomlfile at the rootA package directory containing an empty
__init__.pyfile andAt least one Python module (e.g.
example.py)
You are now ready to install (and build) your Python package!
While you can do this using Hatch, we will use pip for this lesson, so you can see how to install your tool into your preferred environment.
First, open your preferred shell (Windows users may use something like GitBash) and cd into your project directory if you are not already there.
Activate the Python environment that you wish to use.
Run
python -m pip install -e .
# Activate your environment using conda or venv
# Below we use conda but you can do the same thing with venv!
> conda activate pyosdev
(pyosdev)
> conda info
    active environment : pyosdev
    active env location : /Users/your-path/mambaforge/envs/pyosdev
# Cd into your project directory
> cd pyospackage
# Install your package
> python -m pip install -e .

Obtaining file:///Users/leahawasser/Documents/GitHub/pyos/pyosPackage
  Installing build dependencies ... done
  Checking if build backend supports build_editable ... done
  Getting requirements to build editable ... done

# Check to see if the package is installed
> conda list
# use pip list instead of conda list here if you are working in an venv environment rather than a conda envt
What does python -m pip install -e . do?
python -m pip install -e . installs your package into the current active
Python environment in editable mode (-e). Installing your package in
editable mode, allows you to work on your code and then test the updates
interactively in your favorite Python interface. One important caveat of editable mode is that every time you update your code, you need to restart Python.
If you wish to install the package regularly (not in editable mode) you can use:
python -m pip install .
Using python -m when calling pip
Above, you usepython -m to call the version of pip installed into your
current active environment. python -m is important to ensure that you are
calling the version of pip installed in your current environment.
IMPORTANT: pip can also be used to install packages from PyPI. However, in this case, you are telling pip to install your package from a local folder by using the .. You could also specify a path to the project directory on your computer instead of the . which tells pip to use the current working directory.
Look for pyospackage in your environment#
Once you have installed your package, you can view it in your current
environment. If you are using venv or conda, pip list will return
a list of packages in the current active environment.
Note that because pyospackage is installed in editable mode (-e), pip will show you the directory path to your project’s code
$ pip list

➜ pip list
Package                       Version        Editable project location
----------------------------- -------------- --------------------------------------------------------------
...
arrow                         1.2.3
...
...
mamba                         1.1.0
markdown-it-py                2.2.0
MarkupSafe                    2.1.2
matplotlib                    3.7.1
msgpack                       1.0.5
mypy                          1.4.1
nox                           2021.10.1
numpy                         1.24.2
packaging                     23.0
pandas                        1.5.3
pyosPackage                   0.1            /Users/yourusername/path/here/pyosPackage
...
...
...
Step 6: Test out your new package#
After installing your package, type “python” at the command prompt in your chosen terminal to start a Python session in your active Python environment.
You can now import your package and access the add_numbers function.
➜ python
Python 3.11.4 | packaged by conda-forge
Type "help", "copyright", "credits" or "license" for more information.
>>> from pyospackage.example import add_numbers
>>> add_numbers(1, 2)
3
Installing packages from GitHub
If you wish to share your code without publishing to PyPI you can always install packages directly from GitHub using the syntax:
python -m pip install git+https://github.com/user/repo.git@branch_or_tag
To make your package GitHub installable, you can:
Create a new GitHub repository
Push the contents of the project directory that you created above, to GitHub
Finally install the package from GitHub using the command above. When you use the command above, don’t forget to substitute the user, repo, and branch_or_tag with your specific values.
For instance below you install the pyospackage from the main branch of the pyOpenSci repository.
python -m pip install git+https://github.com/user/repo.git@branch_or_tag
Congratulations! You created your first Python package#
You have now created a Python package that you can install into any Python environment.
In the upcoming lessons, you will:
Add a README file and LICENSE to your package
Add more metadata to your
pyproject.tomlfile to support PyPI publication.Learn how to build your package distribution files (sdist and wheel) and publish to test PyPI.
Finally you will learn how to publish to conda-forge from PyPI.
About the Python package directory structure#
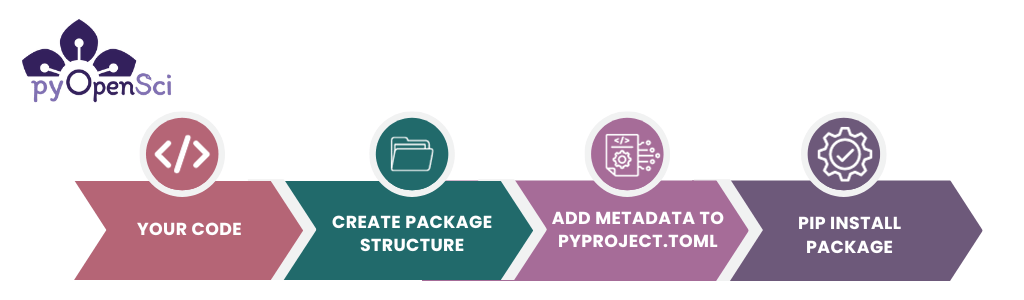
To make your Python code installable you need to create a specific directory structure with the following elements:
A
pyproject.tomlfile.A specific directory structure.
Some code.
An
__init__.pyfile in your code directory.
The directory structure you’ll create in this lesson will look like this:
pyospackage/  # Your project directory
 └─ pyproject.toml
 └─ src/  # The source (src) directory ensures your tests always run on the installed version of your code
    └── pyospackage/  # Package directory where code lives
        ├── __init__.py
        ├── add_numbers.py
        └── # Add any other .py modules that you want here
Once you have the basic items of a Python package (code, metadata and a file structure), you can pip install your package into any Python environment on your computer.#
About the basic package directory structure#
Notice a few things about the above layout:
Your package code lives within a
src/packagenamedirectory. We suggest that you usesrc(short for source code) directory as it ensures that you are running tests on the installed version of your code.Within the
srcdirectory you have a package directory calledpyospackage. Use the name of your package for that directory name. This will be the name for importing your package in Python code once installed.In your package directory, you have an
__init__.pyfile and all of your Python modules. You will learn more about the__init__.pyfile below.The
pyproject.tomlfile lives at the root directory of your package.The name of the root directory for the package is pyospackage which is the name of the package. This is not a requirement but you will often see that the GitHub / GitLab repository and the root directory name are the same as the package name.
What is an __init__.py file?#
The __init__.py file tells Python that a directory
should be treated as a Python package. As such, a directory with an __init__.py file can be imported
directly into Python. The __init__.py file does not need to contain any code in order for Python to recognize it; it can be empty.
For example, following the file structure example above which has an __init__.py file within it, you can run:
import pyospackage
What is a pyproject.toml file?#
The pyproject.toml file is:
Where you define your project’s metadata (including its name, authors, license, etc)
Where you define dependencies (the packages that it depends on)
Used to specify and configure what build backend you want to use to build your package.
After the __init__.py and pyproject.toml files have been added,
your package can be built and distributed as an installable Python
package using tools such as pip. Note that the pyproject.toml file
needs to have a few basic items defined for the package to be
installable including:
The
build-backendthat you want to use,The project
nameandversion.
Why the pyproject.toml file is important
The pyproject.toml file replaces some of the functionality of both the
setup.py file and setup.cfg files.
If you try to pip install a package with no pyproject.toml, you will get the following error:
GitHub/pyospackage/testme
➜ python -m pip install .
ERROR: Directory '.' is not installable.
Neither 'setup.py' nor 'pyproject.toml' found.
If your project already has a setup.py file, Hatch can be used to automatically create a pyproject.toml.