Use a pyproject.toml file for your package configuration & metadata#
pyproject.toml takeaways
There are only two tables that are required for an installable Python package: [build-system] and [project]. The [project] table stores your package’s metadata.
There are two required fields in the [project] table: name= and version=.
Add metadata to the classifiers section of your
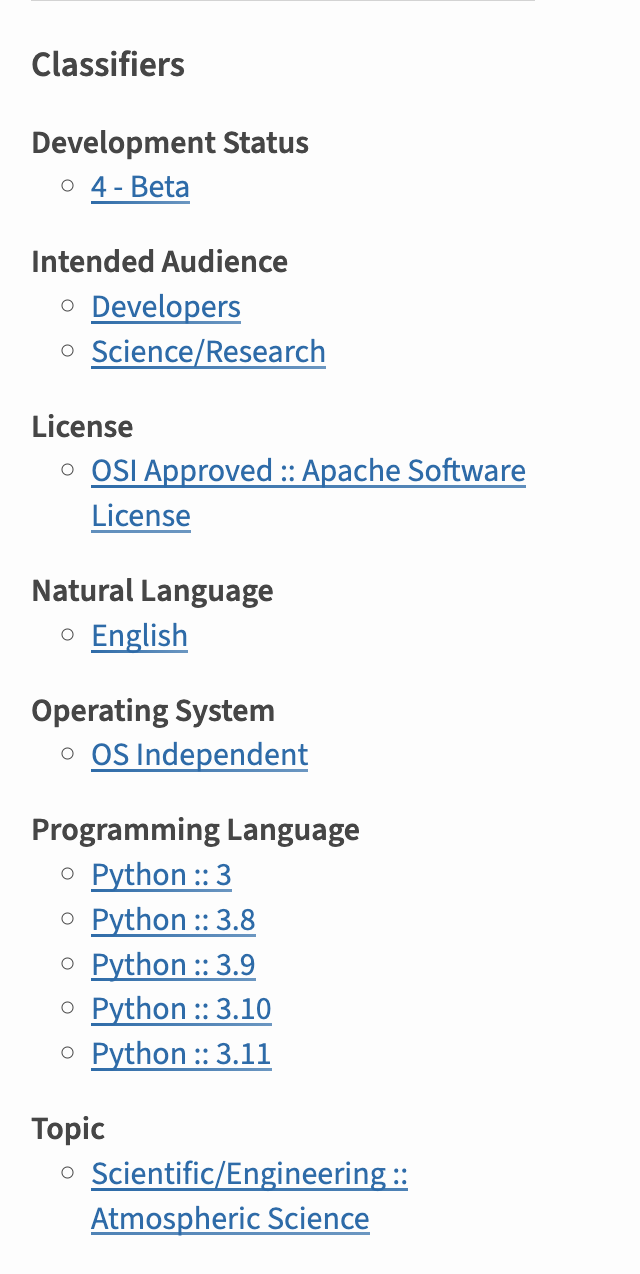
pyproject.tomlfile to make it easier for users to find your project on PyPI.When you are adding classifiers to the [project] table, only use valid values from PyPI’s classifier page. An invalid value here will raise an error when you build your package or publish to PyPI.
There is no specific order for tables in the
pyproject.tomlfile. However fields need to be placed within the correct table sections. For examplerequires =always need to be associated with the [build-system] table.
About the pyproject.toml file#
Every modern Python package should include a pyproject.toml file. For pure Python packages, this file replaces the setup.py and/or setup.cfg file to describe project metadata.
If your project isn’t pure Python, you might still require a setup.py file to build the non-Python extensions. However, a pyproject.toml file should still be used to store your project’s metadata.
Tutorial
If you are migrating from a setup.py or setup.cfg file, and want help, check out this tutorial. specify build requirements and metadata is called a pyproject.toml
About the .toml format#
The pyproject.toml file is written in TOML (Tom’s Obvious, Minimal Language) format. TOML is an easy-to-read structure based on key/value pairs. Each section in the pyproject.toml file contains a [table identifier].
Below that table identifier are key/value pairs that
support configuration for that particular table.
Below
[build-system]is considered a table in the toml language.Within the
build-systemtable,requires =is a key.The associated value for
requiresis an array containing the value"hatchling".
[build-system]
requires = ["hatchling"]
How the pyproject.toml is used when you build a package#
When you publish to PyPI, you will notice that each package has metadata listed. Let’s have a look at xclim, one of our pyOpenSci packages. Notice that on the PyPI landing page you see some metadata about the package including python, maintainer information and more. PyPI is able to populate this metadata because it was defined using correct syntax and classifiers by Xclim’s maintainers, pyproject.toml file. This metadata when the xclim package is built, is translated into a distribution file that allows PyPI to read the metadata and print it out on their website.
When you add the classifier section to your pyproject.toml and your package is built, the build tool organizes the metadata into a format that PyPI can understand and represent on your PyPI landing page. These classifiers also allow users to sort through packages by version of python they support, categories and more.#
Benefits of using a pyproject.toml file#
Including your package’s metadata in a separate human-readable pyproject.toml format also allows someone to view the project’s metadata in a GitHub repository.
Setup.py is still useful for complex package builds
Using setup.py to manage package builds and metadata can cause problems with package development. In some cases where a Python package build is complex, a setup.py file may be required. While this guide will not cover complex builds, we will provide resources working with complex builds in the future.
Optional vs. required pyproject.toml file fields#
When you create your pyproject.toml file, there are numerous metadata fields that you can use. Below we suggest specific fields to get you started that support publication on PyPI and users finding your package.
An overview of all of the project metadata elements can be found here.
Required fields for the [project] table#
As mentioned above, your pyproject.toml file needs to have a name and version field in order to properly build your package:
name: This is the name of your project provided as a stringversion: This is the version of your project. If you are using a SCM tool for versioning (using git tags to determine versions), then the version may be dynamic (more on that below).
Optional fields to include in the [project] table#
We strongly suggest that you also add the metadata keys below as they will help users finding your package on PyPI. These fields will make it clear how your package is structured, what platforms you support and what dependencies your package requires.
Description: this is a short one-line description of your package.
Readme: A link to your README.md file is used for the long long-description. This information will be published on your packages PyPI landing page.
Requires-python (used by pip): this is a field that is used by pip. Here you tell the installer whether you are using Python 2.x or 3.x. Most projects will be using 3.x.
License: the license you are using
Authors: these are the original authors of the package. Sometimes the authors are different from the maintainers. Other times they might be the same.
Maintainers: you can choose to populate this or not. You can populate this using a list with a sub element for each author or maintainer name, email
authors = [
    {name = "Some Maintainer", email = "some-email@pyopensci.org"},
]
project.dependencies: The dependency group is optional because not all packages require dependencies. However, if your project has specific dependencies, include this section in your
pyproject.toml. Dependencies declared in the pyproject.toml file will be installed by uv or pip when your project is installed.project.optional-dependencies: Optional or feature dependencies will be installed if someone runs
python -m pip install projectname[feature]. Use this array to declare dependencies that add specific features to your package that are not installed by default when a user runsuv syncorpython -m pip install packagename.dependency-groups: Dependency groups organize packages and tools that a contributor or developer would need to work on your package. These dependencies may include tools for building and running tests, linters, and code formatters. This is an optional but highly suggested way to organize and install dependencies. This section can replace a requirements.txt file. Learn more about adding these to your package in the PyPA guide here.
keywords: These are the keywords that will appear on your PyPI landing page. Think of them as words that people might use to search for your package.
classifiers: The classifiers section of your metadata is also important for the landing page of your package in PyPI and for filtering of packages in PyPI. A list of all options for classifiers can be found here. Some of the classifiers that you should consider including
Development Status
Intended Audience
Topic
Programming language
Advanced options in the pyproject.toml file#
[project.scripts](Entry points): Entry points are optional. If you have a command line tool that runs a specific script hosted in your package, you may include an entry point to call that script directly at the command line (rather than at the Python shell).Here is an example ofa package that has entry point scripts. Notice that there are several core scripts defined in that package that perform sets of tasks. The pyOpenSci is using those scripts to process their metadata.
Use Dynamic Fields If you have fields that are dynamically populated. For example, you may wish to automatically update your package’s version using Git tags (SCM/version control-based versioning). Example: dynamic = [“version”]
Add dependencies to your pyproject.toml file#
The pyproject.toml file is a modern replacement for the requirements.txt file, which has been traditionally used to store development dependencies and also configuration for tools such as pytest, black, and others.
To add development dependencies to your build, add a [dependency-groups] array to your pyproject.toml file.
Then specify dependency groups as follows:
[project.optional-dependencies]
tests = [
  "pytest",
  "pytest-cov"
]
lint = [
  "black",
  "flake8"
]
docs = [
    "sphinx",
    "pydata-sphinx-theme"
]
Following the above example, you install dependencies like this:
python -m pip install -e .[tests]pip install –group test # requires pip 25.1 or greater
The above will install both your package in editable mode and all of the dependencies declared in the tests section of your [project.optional-dependencies] table.
To install all dependencies and also your package, you’d use:
python -m pip install -e .[tests,lint,docs]
Recursive dependencies
You can also setup sets of recursive dependencies. See this blog post for more.
Example pyproject.toml for building using hatchling#
Below is an example build configuration for a Python project. This example package setup uses hatchling to build the package’s sdist and wheels.
[build-system]
requires = ["hatchling"]
build-backend = "hatchling.build"

[project]
name = "examplePy"
authors = [
    {name = "Some Maintainer", email = "some-email@pyopensci.org"},
]
maintainers = [
    {name = "All the contributors"},
]
description = "An example Python package used to support Python packaging tutorials"
keywords = ["pyOpenSci", "python packaging"]
readme = "README.md"
license = "BSD-3-Clause"
classifiers = [
    "Programming Language :: Python :: 3",
    "Operating System :: OS Independent",
]
dependencies = [
    "dependency-package-name-1",
    "dependency-package-name-2",
]
Notice that dependencies are specified in this file.
Example pyproject.toml for building using setuptools#
The package metadata including authors, keywords, etc is also easy to read. Below you can see the same TOML file that uses a different build system (setuptools). Notice how simple it is to swap out the tools needed to build this package!
In this example package setup you use:
setuptools to build the package’s sdist and wheels
setuptools_scm to manage package version updates using version control tags
In the example below [build-system] is the first table
of values. It has two keys that specify the build backend API and containing package:
requires =build-back-end =
[build-system]
requires = ["setuptools>=61"]
build-backend = "setuptools.build_meta"

[project]
name = "examplePy"
authors = [
    {name = "Some Maintainer", email = "some-email@pyopensci.org"},
]
maintainers = [
    {name = "All the contributors"},
]
description = "An example Python package used to support Python packaging tutorials"
keywords = ["pyOpenSci", "python packaging"]
readme = "README.md"
license = "BSD-3-Clause"
classifiers = [
    "Programming Language :: Python :: 3",
    "Operating System :: OS Independent",
]
dependencies = [
    "dependency-package-name-1",
    "dependency-package-name-2",
]