Setup Trusted Publishing for secure and automated publishing via GitHub Actions#
In the previous Python packaging lessons, you learned:
Learning Objectives
In this lesson, you will learn how to:
Automate building and publishing the package on GitHub Actions
Configure Trusted publishing for the project
Secure your workflow using GitHub action hashes and versions in your workflow file
This tutorial assumes that your project is hosted on GitHub and that you want to publish a package from your project to PyPI.
Configure a release job on GitHub Actions#
GitHub Actions[1] is an infrastructure provided by GitHub to automate software workflows, straight from the GitHub repository of the project. You can configure automated testing for every pull request, automate publishing of documentation, automate creation of web pages for the project, and even automate the release process. For this lesson, we will focus on using actions to release and publish your Python package securely to PyPI.
Why Trusted Publishing Matters
If you are wondering why trusted publishing is so important, check out this blog post: that dives deeper into what can happen when you don’t lock down your publishing workflows.
Step 0: Create a release workflow#
To get started, create a file named release.yaml under the .github/workflows
directory of your project. If the .github/workflows directory does not exist, you can create it. It is
GitHub’s convention that all GitHub Actions are configured via YAML files in the
.github/workflows directory.
Naming your workflow file
You can name the workflow file whatever you wish. We suggest using something
simple and expressive like release.yaml so you, your future self, and contributors
who work on your project know exactly what the workflow does.
Step 1: Name the workflow#
At the top of the release.yaml file, type the following:
name: Release
This provides a name to the workflow that you can use to quickly find all runs of this GitHub Action on the “Actions” tab in the GitHub repository.
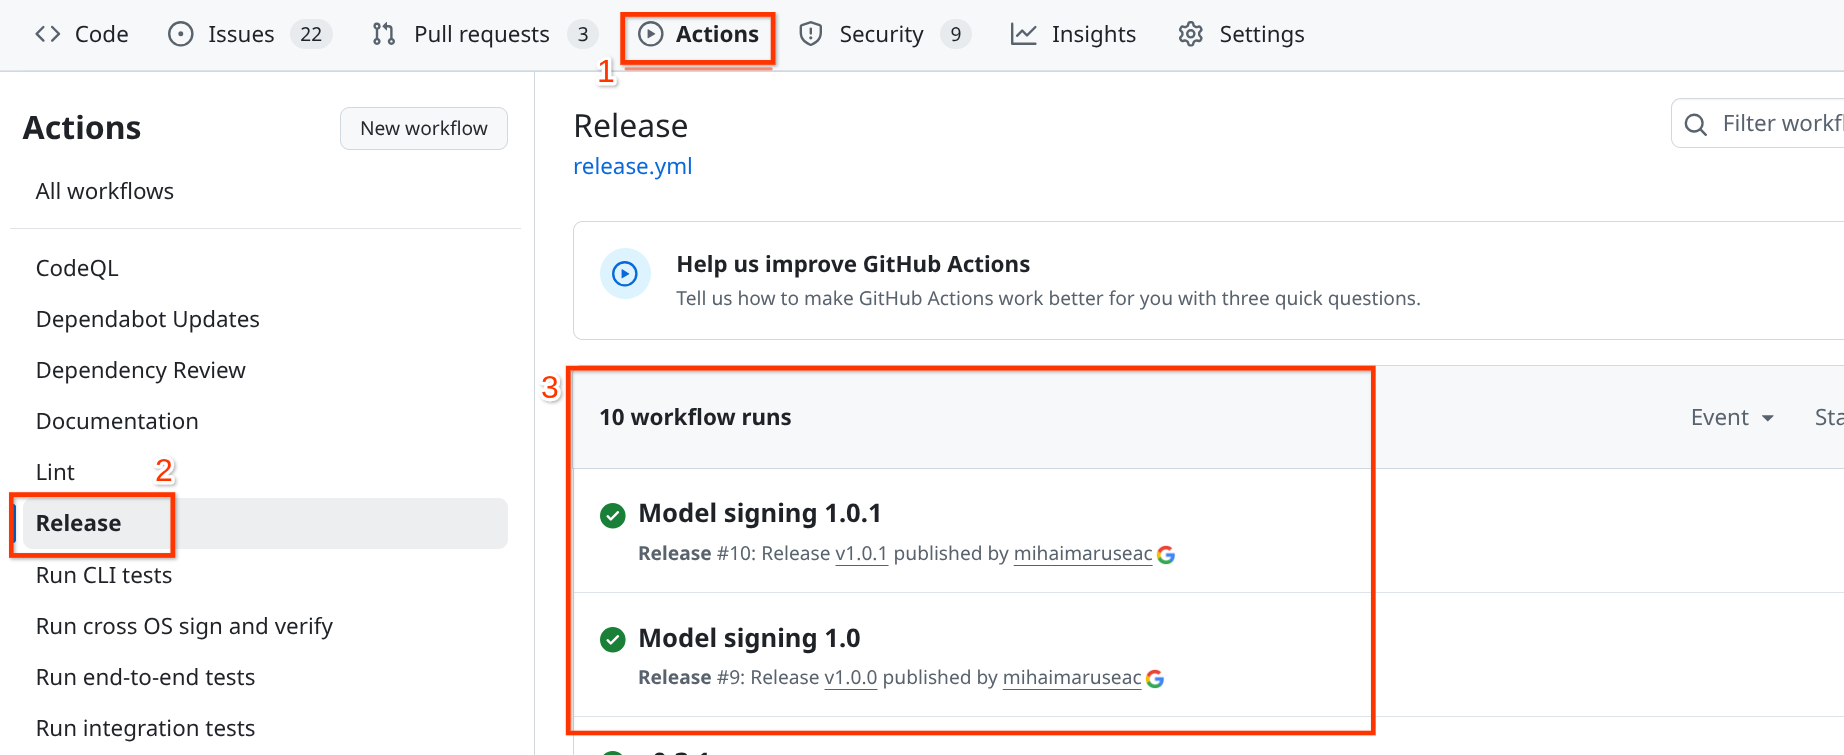
This image shows an example of a configured workflow for the release. On the top, in the red box labeled “1” you see the “Actions” tab of the GitHub repository. On the left, in the red box labeled “2” you can see the name of the workflow, as configured in this step. Finally, in the center, in the red box labeled “3” you can see several runs of the workflow, for the “1.0” and “1.0.1” releases of the package.#
Step 2: Add triggers to the workflow#
Every GitHub Actions workflow runs when certain conditions are met. In this case,
we assume that a
release workflow should only run when the repository owner creates a new release
for the package. Add the following to the release.yaml file to ensure it runs when you create and publish a release:
on:
  release:
    types:
      - published  # This tells GitHub to only run this workflow when a release of your package is published
Step 3: Configure the jobs in the workflow#
A GitHub Actions workflow file can contain multiple jobs that run independently; each job can also have multiple steps. When triggered, the GitHub Action runs all the jobs in a workflow (excluding any steps that have conditional requirements).
Note
Jobs and steps can also have conditional logic that allows them only to run if specific criteria exist. For instance, you may want only to have a job step to publish to PyPI if a release was made for the package. But you might want to test building the package every time you merge a new pull request.
For a release job, you need to clone or check out the repository. You can use
the actions/checkout action to check out the code. You then install and use
Hatch to build
your package.
You also need to make sure to set up Hatch on the machine GitHub is using to run the workflow.
A minimal job definition would look like this:
jobs:
  build_package:
    name: Build the package
    runs-on: ubuntu-latest
    steps:
    - uses: actions/checkout@v5
    - name: Setup Python
        uses: actions/setup-python@v6
        with:
          python-version: "3.12" # Select the version that you want to build your package on
    - name: Upgrade pip, install Hatch, and check Hatch version
        run: |
          pip install --upgrade pip
          pip install --upgrade hatch
          hatch --version # Verify that Hatch is installed
Notice that above, you provide a version for each action step. action/checkout@v5 tells GitHub to use version 5 of the checkout action. The checkout action checks out the code from your repository. In this case, the code will be used to build your package.
Next, you will learn about a better way to secure (or “harden”) your workflow
Step 4: Secure the GitHub Actions workflow#
There are several improvements you can make to the GitHub Actions workflow you just configured to improve security and readability.
First, we can give names to relevant steps in the process to increase
the readability of the logs generated during the workflow run. This can be achieved
using name: <your description here> lines.
More importantly, each time you use an existing action (via uses) you should pin
that action to a commit hash. Pinning your action ensures that if a malicious user takes over
the action, they won’t be able to impact your repository (an example of a supply
chain attack due to GitHub Actions is the recent tj-actions/changed-files
attack[2]).
Tip
Enabling Dependabot[3] in the repository will ensure that your actions stay up to date. The dependabot tool will open pull requests that update your action versions at whatever frequency you want.
Thus, the workflow that you should use should be similar to:
name: Release

on:
  release:
    types:
      - published

permissions: {} # no permissions to the token at global level

jobs:
  build_package:
    name: Build the package
    runs-on: ubuntu-latest
    permissions:
      contents: read # this job only needs read access
    steps:
      - uses: actions/checkout@3d3c42e5aac5ba805825da76410c181273ba90b1 # v7.0.1
        with:
          persist-credentials: false
      - name: Setup Python
        uses: actions/setup-python@5fda3b95a4ea91299a34e894583c3862153e4b97 # v7.0.0
        with:
          python-version: "3.12" # Select the version that you want to build your package on
      - name: Upgrade pip, install Hatch, and check Hatch version
        run: |
          pip install --upgrade pip
          pip install --upgrade hatch
          hatch --version # Verify that Hatch is installed
      - name: Build artifacts
Now, you can commit the .github/workflows/release.yaml file to the repository and push to GitHub.
At this point, if you create a new release for your project on GitHub, the configured workflow should run and build a wheel for you. Unfortunately, the wheel is only available on the runner and will be deleted at the end of the workflow run.
Step 5: Upload the built artifact to GitHub Artifacts#
You need to add one more step to the job definition to be able to access the
wheel. You will upload it to the artifacts temporary area[4]. Add
the following to the release.yaml file:
        with:
          path: dist/
          name: dist.zip
          if-no-files-found: error
          retention-days: 1
Upload artifacts parameters
Above, you have configured the artifact to be deleted after 1 day. The artifacts storage on GitHub actions is temporary; users should not download your package from the GitHub artifacts.
You have also configured the release job to error if the dist/ directory does
not exist. This means that hatch build (from the previous step) failed to
build our package, so there is nothing to release.
At this point, if you push the release.yaml to GitHub and create a new
release, the GitHub Actions job will:
run,
clone your repository,
install and set up Hatch,
build your package and
upload your package as an archive to the artifacts storage.
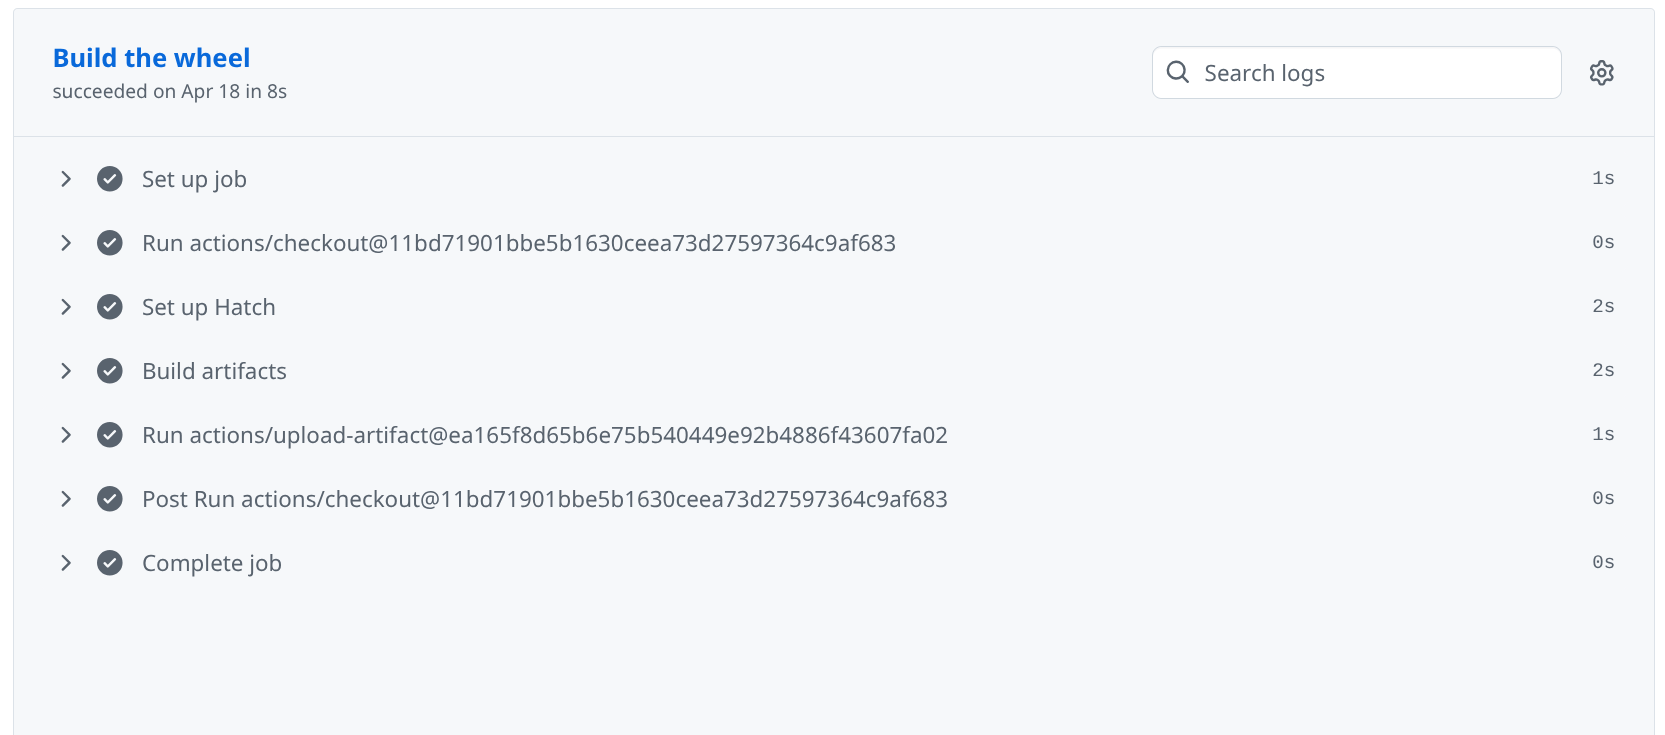
This figure shows an example of a release workflow that has just finished running. Each step in the log is matched to one step in the workflow definition.#
At the bottom of the workflow run page on GitHub, you should see a section for the artifacts produced during runtime and uploaded to this storage area:

This figure shows the artifact produced by the above release workflow. It is now marked as expired since the workflow ran more than a day ago.#
You can download the artifact (before it expires), unzip it, and install the wheel contained within. However, this should only be done if you want to test the built wheel. Next, you will configure uploading to PyPI using trusted publishing.
Configure automatic publishing to PyPI#
The job you configured above using GitHub Actions builds your package using your code. You still need to upload it to PyPI. You could upload the package from the same job, but it is better to create a separate one to maintain a separation of tasks. This is why, in the previous section, we uploaded the artifact to the temporary storage.
In the new job, you will download the package from there and upload it
to PyPI. Since the build job does nothing else, there is no possibility that the
package could get compromised before the release.
Step 1: Add the upload job#
In the release.yaml file, add the following new job, after the job defined in
the previous section:
    name: Publish release to PyPI
    needs: [build_package]
    runs-on: ubuntu-latest
    environment:
      name: pypi
      url: <URL TO YOUR PROJECT HERE>
    permissions:
      contents: read # this job needs read access
      id-token: write # but also needs to be able to write the publishing token
    steps:
      - uses: actions/download-artifact@3e5f45b2cfb9172054b4087a40e8e0b5a5461e7c # v8.0.1
        with:
          name: dist.zip
          path: dist/
      - uses: pypa/gh-action-pypi-publish@ba38be9e461d3875417946c167d0b5f3d385a247 # v1.14.1
Make sure to change the URL
Remember to change the url: value to the URL for your package on PyPI!
This job has two steps:
It uses
download-artifactto download the artifacts built in the previous jobIt uses
gh-action-pypi-publishto publish the package to PyPI.
You are almost there!! Now, you just need to enable trusted publishing for your project on PyPI. And then, your work is done!
Step 2: Enable trusted publishing on PyPI#
This lesson is the first in a series of lessons to help you get started with Python packaging.#
Before trusted publishing was created, in order to upload to PyPI from GitHub
actions you would have needed to add the username and password as arguments to
the gh-action-pypi-publish step. While documentation recommends using the
GitHub’s secrets environment for the password/token, in several cases, users
were pasting the password directly into the workflow file. Furthermore, accidental leakage
of the password or token could allow attackers to publish new packages using your account, until
you discover the compromise and revoke the leaked credentials.
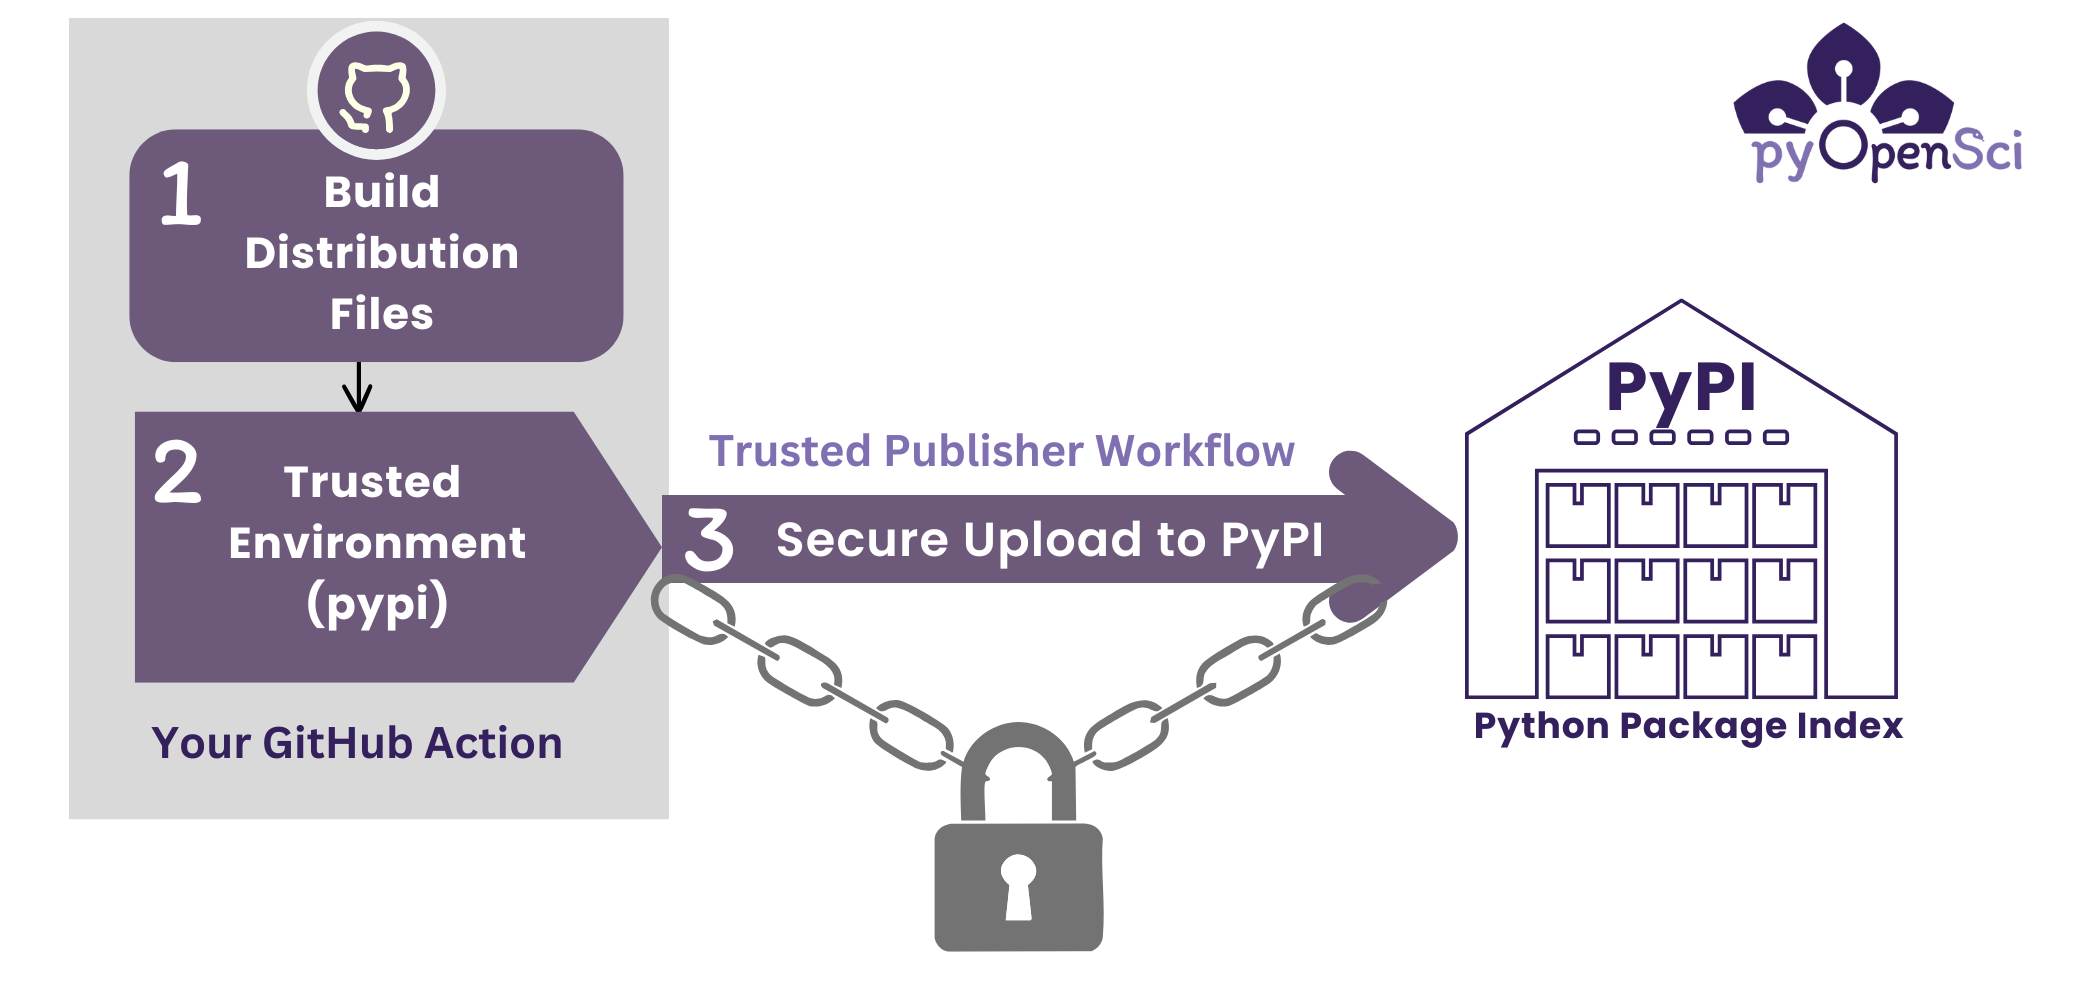
To prevent these incidents and improve supply chain security, developers created Trusted Publishing. Trusted publishing allows you to register a publishing workflow on PyPI and then map that workflow to an automation workflow (e.g., GitHub Actions) that is allowed to publish the package.
You do not need to enter a token or password value in a trusted publisher workflow. It’s a secure connection between your
Trusted Publishing outside of GitHub Actions
Trusted Publishing supports other automation platforms, beyond GitHub Actions. It is also possible to configure a trusted publisher for multiple workflows or multiple publishers for the same package. These are advanced uses, out of scope for this lesson.
For this lesson, we will focus on configuring a trusted publisher for a project that already exists on PyPI. If you completed the lesson about PyPI publishing, you should have this project already created.
This setup step needs to be performed only once for the project. Future releases
will only run the GitHub Actions workflow we are configuring in release.yaml.
On the “Your projects” page on PyPI, click “Manage” on any project you want to configure.
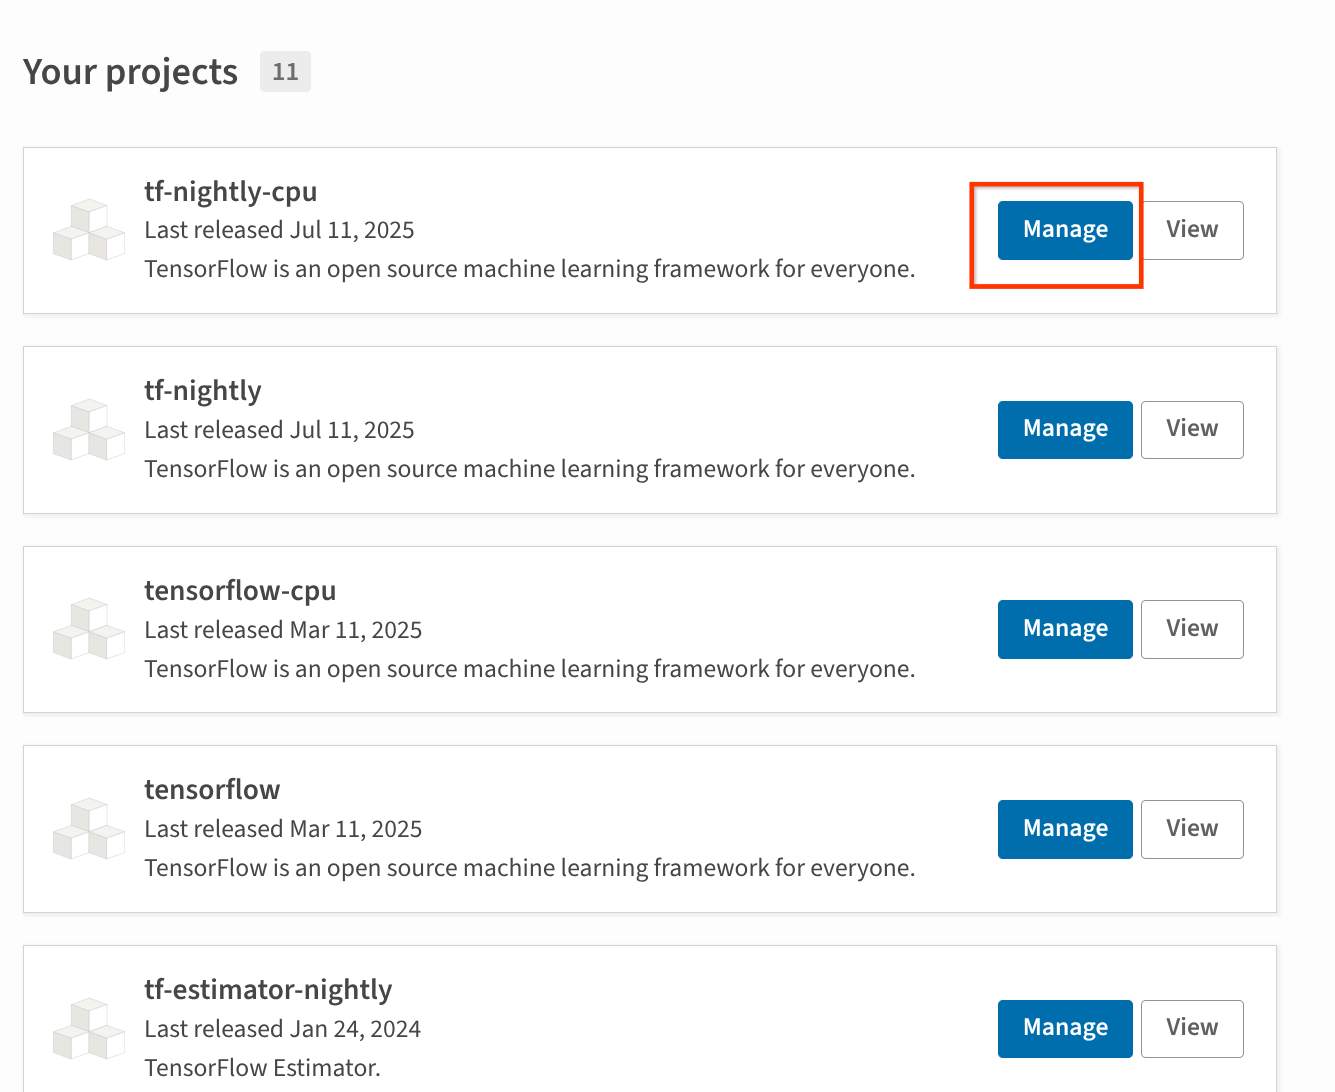
This image shows several projects. The “Manage” button is highlighted for one of the projects, the one we want to configure trusted publishing for.#
Then click “Publishing” in the project’s sidebar.
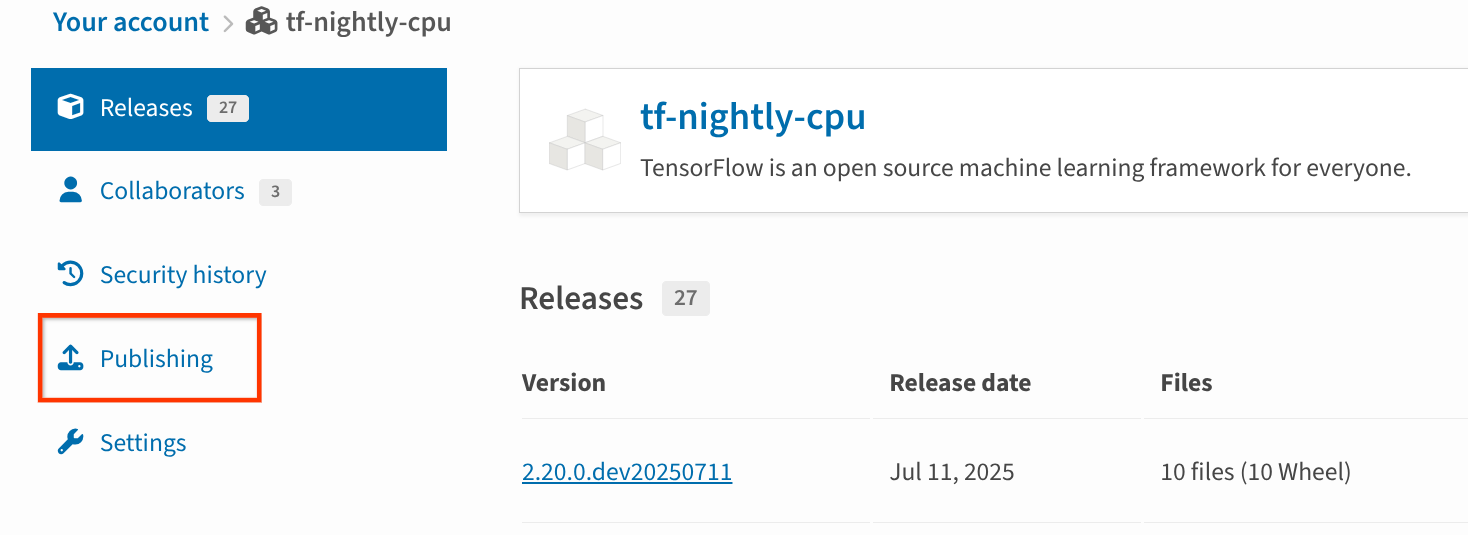
Once clicking on the “Manage” button we got to the project’s page. In the sidebar, we have the “publishing” option, as highlighted here.#
This will take you to the publisher configuration page for the project. Trusted publishers can be configured via the forms here. Fill in the GitHub form with the following information:
Owner: the GitHub organization name for the organization that owns the project. If this is your personal project, then use your GitHub username here.
Repository name: the name of the repository that contains the project.
Workflow name: Should be
release.yamlif you followed this guide, it is the workflow we just configured.Environment name: Should be
pypi, as that is what we configured inrelease.yaml.
Once you fill in this form and click “Add” the publisher is configured and can be used to publish new releases of your package.
Fully hardened GitHub Actions release workflow#
For better security, it is also recommended to control the permissions of the GitHub token used within each job of the workflow. The permissions should be scoped at job level and be as minimal as possible. A workflow that configures trusted publishing and also does this is the following:
name: Release

on:
  release:
    types:
      - published

permissions: {} # no permissions to the token at global level

jobs:
  build_package:
    name: Build the package
    runs-on: ubuntu-latest
    permissions:
      contents: read # this job only needs read access
    steps:
      - uses: actions/checkout@3d3c42e5aac5ba805825da76410c181273ba90b1 # v7.0.1
        with:
          persist-credentials: false
      - name: Setup Python
        uses: actions/setup-python@5fda3b95a4ea91299a34e894583c3862153e4b97 # v7.0.0
        with:
          python-version: "3.12" # Select the version that you want to build your package on
      - name: Upgrade pip, install Hatch, and check Hatch version
        run: |
          pip install --upgrade pip
          pip install --upgrade hatch
          hatch --version # Verify that Hatch is installed
      - name: Build artifacts
        run: hatch build
      - uses: actions/upload-artifact@043fb46d1a93c77aae656e7c1c64a875d1fc6a0a # v7.0.1
        with:
          path: dist/
          name: dist.zip
          if-no-files-found: error
          retention-days: 1

  publish_release_to_pypi:
    name: Publish release to PyPI
    needs: [build_package]
    runs-on: ubuntu-latest
    environment:
      name: pypi
      url: <URL TO YOUR PROJECT HERE>
    permissions:
      contents: read # this job needs read access
      id-token: write # but also needs to be able to write the publishing token
    steps:
      - uses: actions/download-artifact@3e5f45b2cfb9172054b4087a40e8e0b5a5461e7c # v8.0.1
        with:
          name: dist.zip
          path: dist/
      - uses: pypa/gh-action-pypi-publish@ba38be9e461d3875417946c167d0b5f3d385a247 # v1.14.1
You can copy the above into your release.yaml file. You only need to update
the url: field and configure trusted publishing on PyPI.
Note
The workflow above should be up to date with the current versions of GitHub actions. However, it’s good to turn on Dependabot to update the action versions in the future.
You have enabled trusted publishing for your project#
Congratulations!! You have now configured your project to do secure releases when a new version is being tagged on GitHub. The workflow we have configured builds the package from the exact version of code that we are tagging. This provides a guarantee for your users that the package that you have released does precisely what the code states it does. There is little to no potential for supply chain related vulnerabilities arising from your package! If you have a package that is ready for real-world use on the real PyPI, then you can follow the same steps to publish it securely.