Learn about Building a Python Package#

Once you have published both package distributions (the source distribution and the wheel) to PyPI, you can then publish to conda-forge. The conda-forge requires an source distribution on PyPI in order to build your package on conda-forge. You do not need to rebuild your package to publish to conda-forge.#
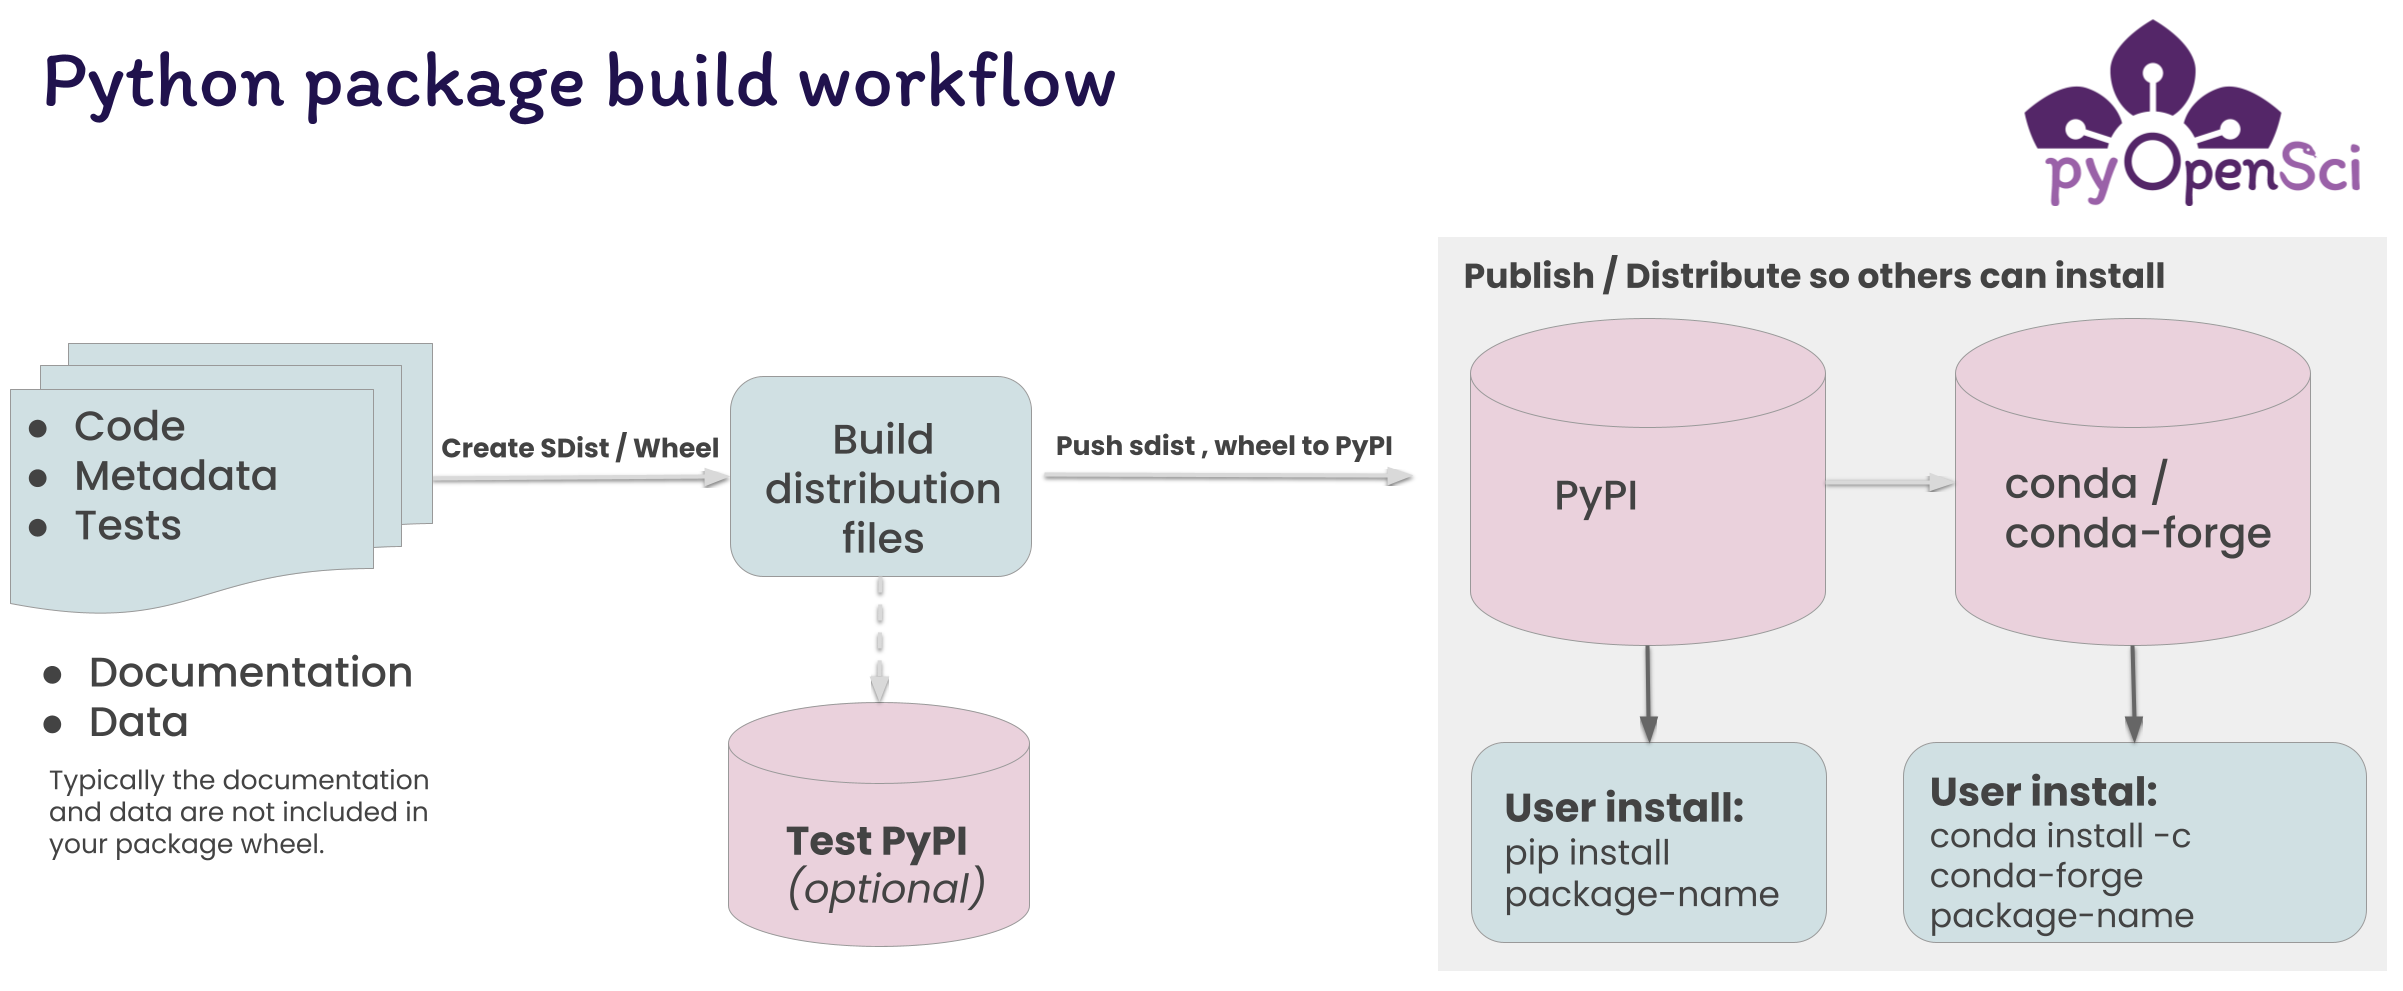
You need to build your Python package in order to publish it to PyPI (or a conda channel). The build process organizes your code and metadata into a distribution format that can be uploaded to PyPI and subsequently downloaded and installed by users. NOTE: you need to publish a sdist to PyPI in order for conda-forge to properly build your package automatically.
What is building a Python package?#
To publish your Python package and make it easy for anyone to install, you first need to build it.
But, what does it mean to build a Python package?
As shown in the figure above, when you build your Python package, you convert the source files into something called a distribution package. A distribution package contains your source code and metadata about the package, in the format required by the Python Package Index, so that it can be installed by tools like pip.
Note
The term package used to mean many different things in Python and other languages. On this page, we adapt the convention of the Python Packaging Authority and refer to the product of the build step as a distribution package.
This process of organizing and formatting your code, documentation, tests and metadata into a format that both pip and PyPI can use, is called a build step.
Project metadata and PyPI#
The metadata that both build tools and PyPI uses to describe and understand your package is generally stored in a pyproject.toml file. This metadata is used for several purposes:
It helps whatever tool you use to build your package (pip, pypa’s Build or an end-to-end tool such as poetry, PDM or Hatch) understand how to build your package. Information it provides to your build tool includes:
The
[build-system]table in your pyproject.toml file tells pip what build backend tool you wish to use for creating your sdist and wheel distributions.
[build-system]
requires = ["hatchling"]
build-backend = "hatchling.build"
And the dependencies section of your project table tells the build tool and PyPI what dependencies your project requires.
dependencies = [
    "numpy",
    "geopandas",
]
When the build tool creates your package distribution file (the file that you publish on PyPI), it also creates a METADATA file which PyPI can read and use to help users find your package. For example:
The
classifiers =section of your[project]table in the pyproject.toml file provides information that users on PyPI can use to filter for packages that address different topics or that support specific versions of python.
classifiers = [
    # How mature is this project? Common values are
    "Development Status :: 4 - Beta",

    # Indicate who your project is intended for
    "Intended Audience :: Developers",
    "Topic :: Software Development :: Build Tools",
    "Programming Language :: Python :: 3 :: Only",
    "Programming Language :: Python :: 3.10",
    "Programming Language :: Python :: 3.11",
]
What happened to setup.py and setup.cfg for metadata?
Project metadata used to be stored in either a setup.py file or a setup.cfg file. The current recommended practice for storing package metadata is to use a pyproject.toml file. Learn more about the pyproject.toml file here.
An example - xclim#
When you publish to PyPI, you will notice that each package has metadata listed. Let’s have a look at xclim, one of our pyOpenSci packages. Notice that on the PyPI landing page you see some metadata about the package including python, maintainer information and more. PyPI is able to populate this metadata because it was defined using correct syntax and classifiers by Xclim’s maintainers, pyproject.toml file. This metadata when the xclim package is built, is translated into a distribution file that allows PyPI to read the metadata and print it out on their website.
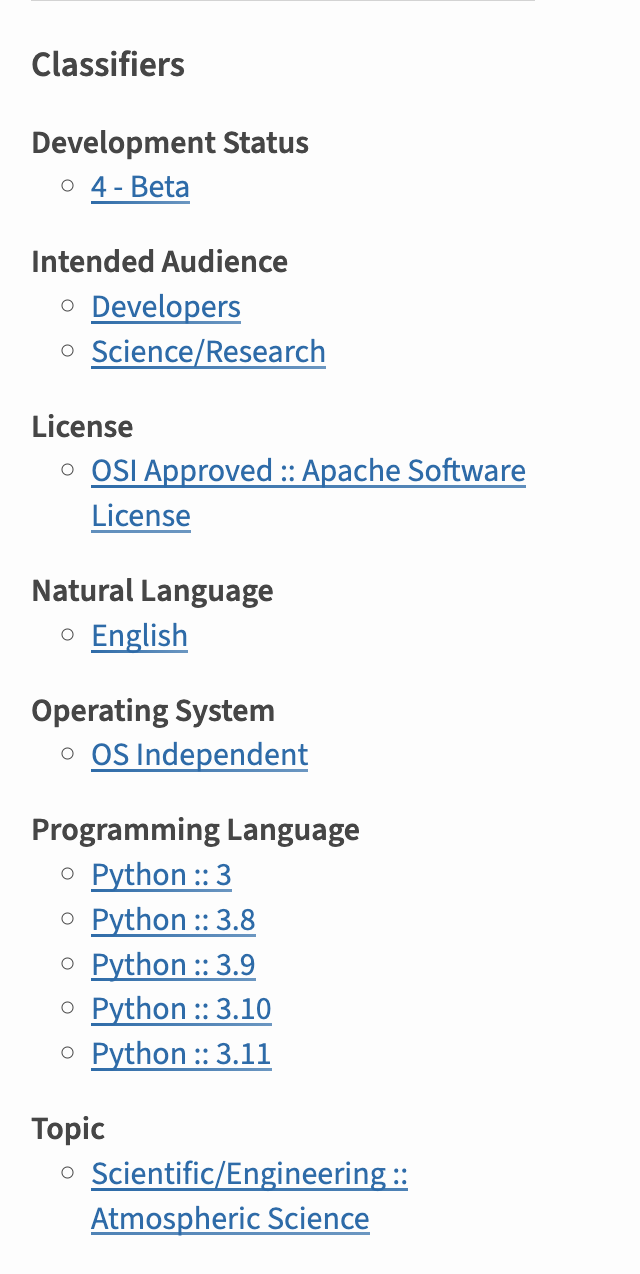
When you add the classifier section to your pyproject.toml and your package is built, the build tool organizes the metadata into a format that PyPI can understand and represent on your PyPI landing page. These classifiers also allow users to sort through packages by version of python they support, categories and more.#
You need to build your Python package in order to publish it to PyPI (or Conda). The build process organizes your code and metadata into a distribution format that can be uploaded to PyPI and subsequently downloaded and installed by users. NOTE: you need to publish a sdist to PyPI in order for conda-forge to properly build your package automatically.#
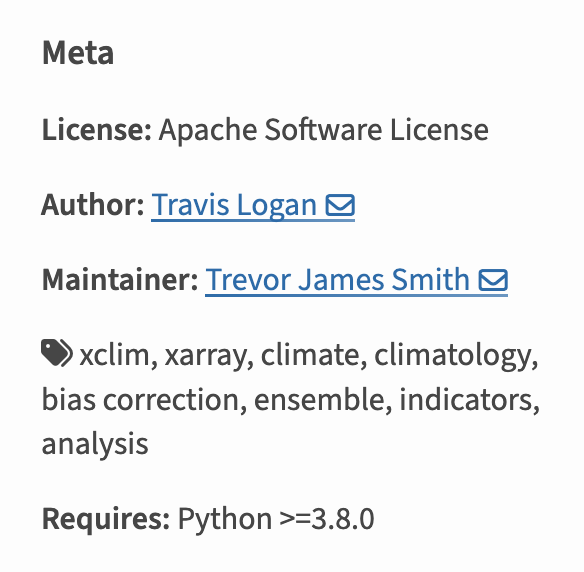
PyPI screenshot showing metadata for the xclim package.#
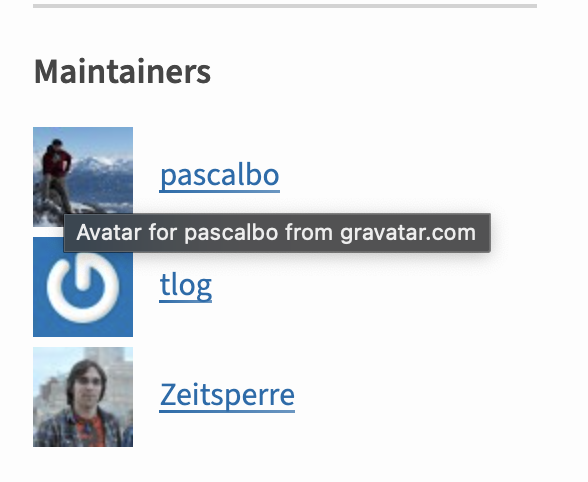
Maintainer names and GitHub usernames for the xclim package as they are displayed on PyPI. This information is recorded in your pyproject.toml and then processed by your build tool and stored in your packages sdist and wheel distributions.#
How to create the distribution format that PyPI and Pip expects?#
You could in theory create your own scripts to organize your code the way PyPI wants it to be. However, just like there are packages that handle known structures such as Pandas for data frames and Numpy for arrays, there are packages and tools that help you create package build distribution files.
Note
There are a suite of packaging tools that can either help you with the entire packaging process or just one step of the process. For instance setuptools is a commonly used build back end that can be used to create your sdist and wheel. Whereas tools like Hatch, PDM, Poetry and flit help with other parts of the packaging process.
While this can cause some confusion and complexity in the packaging ecosystem - for the most part, each tool provides the same distribution output (with minor differences that most users may not care about). Learn more about those tools on this page.
Below, you will learn about the two distribution files that PyPI expects you to publish: sdist and wheel. You will learn about their structure and what files belong in each.
There are two core distribution files that you need to create to publish your Python package to PyPI source distribution (often called an sdist) and wheel. The sdist contains the raw source code for your package. The wheel (.whl) contains the built / compiled files that can be directly installed onto anyones’ computer.
Learn more about both distributions below.
Note
If your package is a pure python package with no additional build / compilation steps then the sdist and wheel distributions will have similar content. However if your package has extensions in other languages or is more complex in its build, the two distributions will be very different.
Also note that we are not discussing conda build workflows in this section. You can learn more about conda builds here.
What is a source distribution (sdist)#
Source files are the unbuilt files needed to build your package. These are the “raw / as-is” files that you store on GitHub or whatever platform you use to manage your code.
Source Distributions (S + Dist) are referred to as sdist. As the name implies, a SDIST contains the source code; it has not been built or compiled in any way. Thus, when a user installs your source distribution using pip, pip needs to run a build step first. For this reason, you could define a source distribution as a compressed archive that contains everything required to build a wheel (except for project dependencies) without network access.
Sdist is normally stored as a .tar.gz archive (often called a “tarball”). Thus, when a user installs your source distribution using pip, pip needs to run a build step first.
Below is an example sdist for the stravalib Python package:
stravalib-1.1.0.post2-SDist.tar.gz file contents

├─ 📂 stravalib
│  ├─ tests
│  │  ├─ integration
│  │  │  ├─ __init__.py
│  │  │  ├─ conftest.py
│  │  │  ├─ strava_api_stub.py
│  │  │  └─ test_client.py
│  │  ├─ unit
│  │  │  ├─ __init__.py
│  │  │  ├─ test_attributes.py
│  │  │  ├─ ...
│  │  ├─ __init__.py
│  │  ├─ auth_responder.py
│  │  └─ test.ini-example
│  ├─ util
│  │  ├─ __init__.py
│  │  └─ limiter.py
│  ├─ __init__.py
│  ├─ _version.py
│  ├─ _version_generated.py
│  ├─ attributes.py
│  ├─ ...
├─ stravalib.egg-info
│  ├─ PKG-INFO
│  ├─ SOURCES.txt
│  ├─ dependency_links.txt
│  ├─ requires.txt
│  └─ top_level.txt
├─ CODE_OF_CONDUCT.md
├─ CONTRIBUTING.md
├─ LICENSE.txt
├─ MANIFEST.in
├─ Makefile
├─ PKG-INFO
├─ README.md
├─ CHANGELOG.md
├─ environment.yml
├─ pyproject.toml
├─ requirements-build.txt
├─ requirements.txt
└─ setup.cfg
GitHub archive vs sdist
When you make a release on GitHub, it creates a git archive that contains all
of the files in your GitHub repository. While these files are similar to an
sdist, these two archives are not the same. The sdist contains a few other
items including a metadata directory and if you use setuptools_scm or hatch_vcs
the sdist may also contain a file that stores the version.
What is a Python wheel (whl):#
A wheel file is a ZIP-format archive whose filename follows a specific format
(below) and has the extension .whl. The .whl archive contains a specific
set of files, including metadata that are generated from your project’s
pyproject.toml file. The pyproject.toml and other files that may be included in
source distributions are not included in wheels because it is a built
distribution.
The wheel (.whl) is your built binary distribution. Binary files are the built / compiled source files. These files are ready to be installed. A wheel (.whl) is a zip file containing all of the files needed to directly install your package. All of the files in a wheel are binaries - this means that code is already compiled / built. Wheels are thus faster to install - particularly if you have a package that requires build steps.
The wheel does not contain any of your package’s configuration files such as setup.cfg or pyproject.toml. This distribution is already built so it’s ready to install.
Because it is built, the wheel file will be faster to install for pure Python projects and can lead to consistent installs across machines.
Tip
Wheels are also useful in the case that a package needs a setup.py file to support a more complex build. In this case, because the files in the wheel bundle are pre built, the user installing doesn’t have to worry about malicious code injections when it is installed.
The filename of a wheel contains important metadata about your package.
Example: stravalib-1.1.0.post2-py3-none.whl
name: stravalib
version: 1.1.0
build-number: 2 (post2) (read more about post here)
py3: supports Python 3.x
none: is not operating system specific (runs on windows, mac, linux)
any: runs on any computer processor / architecture
What a wheel file looks like when unpacked (unzipped):
stravalib-1.1.0.post2-py3-none.whl file contents:

├─ 📂 stravalib
│  ├─ tests
│  │  ├─ functional
│  │  │  ├─ __init__.py
│  │  │  ├─ test_client.py
│  │  ├─ unit
│  │  │  ├─ __init__.py
│  │  │  ├─ test_attributes.py
│  │  ├─ __init__.py
│  │  ├─ auth_responder.py
│  │  └─ test.ini-example
│  ├─ util
│  │  ├─ __init__.py
│  │  └─ limiter.py
│  ├─ __init__.py
│  ├─ _version.py
│  ├─ _version_generated.py
│  ├─ attributes.py
│  ├─ client.py
└─ stravalib-1.1.0.post2.dist-info  # Package metadata are stored here
   ├─ LICENSE.txt
   ├─ METADATA
   ├─ RECORD
   ├─ WHEEL
   └─ top_level.txt