Publish your Python package to PyPI#
In the previous Python packaging lessons, you’ve learned:
What a Python package is
How to make your code installable.
Learning Objectives
In this lesson you will learn how to:
Build your package’s Source distribution (sdist) and Wheel (.whl) Distribution files
Setup an account on TestPyPI (the process is similar for PyPI)
Publish your package to TestPyPI and PyPI
You will do all of your development work in this lesson using Hatch.
Once your package is on PyPI you can publish it to conda-forge (which is a channel on conda) using Grayskull.
You will learn how to publish to conda-forge in the next lesson.
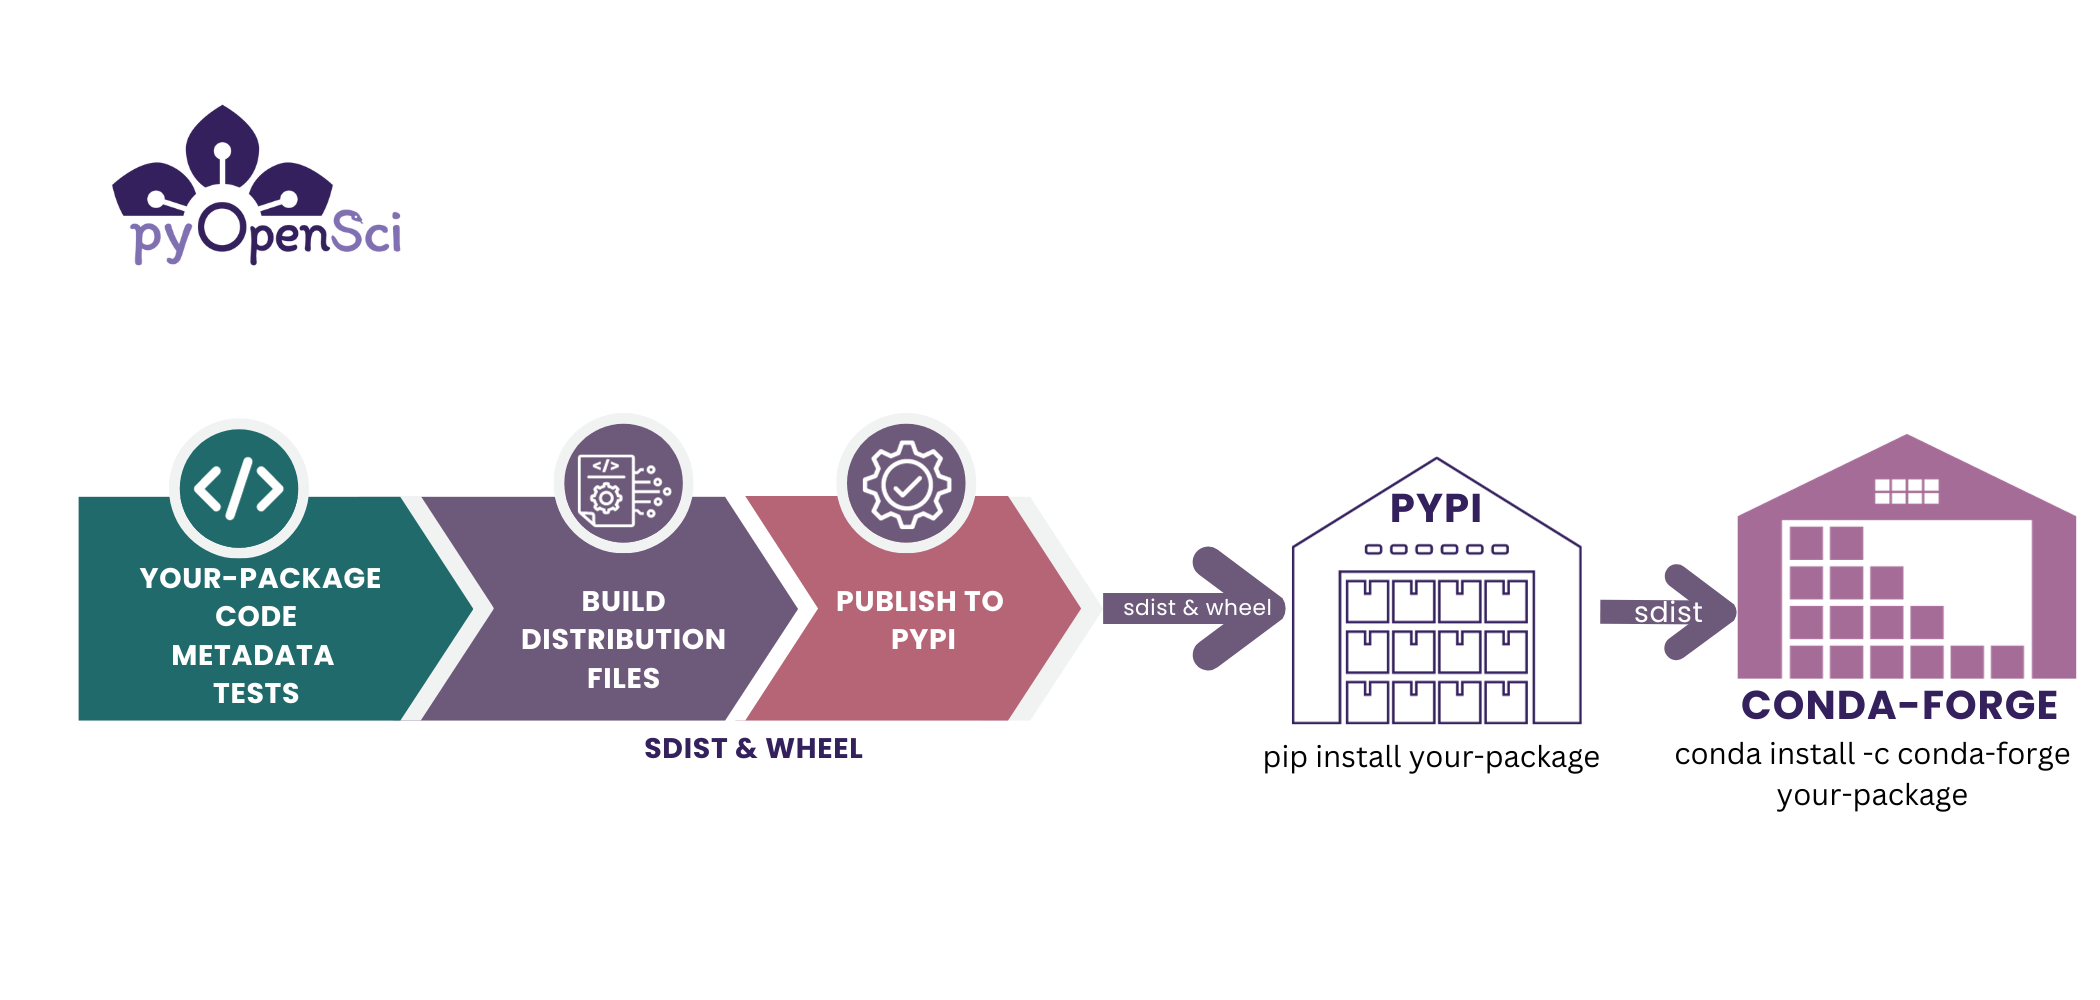
You need to build your Python package in order to publish it to PyPI (or Conda). The build process organizes your code and metadata into a distribution format that can be uploaded to PyPI and subsequently downloaded and installed by users.#
TestPyPI vs PyPI#
There are two repositories associated with PyPI to which you can upload your Python package.
TestPyPI: TestPyPI is a package repository provided by PyPI that you can use for testing that your package can be uploaded, downloaded, and installed correctly. This is a great place to practice and learn how to publish a package without exposing your incomplete package on the real PyPI service.
PyPI: This is the live, production PyPI repository where you can officially publish your Python package, and from which users will get your package. IMPORTANT: Only publish your package to PyPI when you are ready for it to be used by others and/or confident that it will become a package that you will maintain. PyPI is not a place to practice learning how to publish a Python package.
The steps for publishing on TestPyPI vs. PyPI are similar with the exception of a different url. We will point out where they differ.
4 Steps for publishing a Python package on TestPyPI (or PyPI)#
In this lesson you will learn how to publish your package to TestPyPI using Hatch. There are 4 things that you need to do to publish your Python package: to TestPyPI. You need to:
Create a package development environment
Build your package using
hatch build. Building a package is the process of turning your code into two types of distribution files: sdist and wheel. The wheel distribution file is particularly important for users who will use pip to install your package.Create an account on TestPyPI (or PyPI): You will need to create a TestPyPI account and associated API token which provides permissions for you to upload your package. When you later publish your package to PyPI, you will need a separate PyPI account and token.
Publish to TestPyPI using
hatch publish
In a future lesson, you will learn how to create an automated GitHub Actions workflow that publishes an updated version of your package to PyPI every time you create a GitHub release.
Learn more about building Python packages in our guide
Step 1: Create a Python package development environment#
The first step in building your package is to create a development environment. The Python environment will contain all of the dependencies needed to both install and work on your package.
Use Hatch to create your environment.
# This will create a default environment with your package installed in editable mode
> hatch env create
# If you have already created an environment this command will return Environment `default` already exists
Then view all of the current environments that hatch has access to:
> hatch env show
     Standalone
┏━━━━━━━━━┳━━━━━━━━━┓
┃ Name    ┃ Type    ┃
┡━━━━━━━━━╇━━━━━━━━━┩
│ default │ virtual │
└─────────┴─────────┘
Then activate the environment. Note that when you call a shell from a Hatch environment, it will automatically install your package into the environment in development or editable mode.
# Hatch shell can be used to activate your environment
> hatch shell
... Installing project in development mode
source "/Path/to/env/here/hatch/env/virtual/pyosPackage/Mk7F5Y0T/sphinx-2i2c-theme/bin/activate"
View what’s in the environment using pip list:
➜ pip list
Package         Version      Editable project location
--------------- ------------ ----------------------------------------------------
numpy           1.26.3
pandas          2.1.4
pip             23.3.1
pyosPackage     0.1.0        /path/to/your/project/here/pyosPackage
python-dateutil 2.8.2
pytz            2023.3.post1
six             1.16.0
tzdata          2023.4
At any time you can exit the environment using exit.
➜ hatch shell
source "/Users/leahawasser/Library/Application Support/hatch/env/virtual/pyospackage/twO2iQR3/pyospackage/bin/activate"

# Notice here you're in the (pyospackage) environment which is the default
pyosPackage (☊ main) [✎ ×1 ] is 📦 v0.1.4 via 🐍 pyenv (pyospackage)
➜ exit

pyosPackage (☊ main) [✎ ×1 ] is 📦 v0.1.4 via 🐍 pyenv took 43s
➜
Hatch and environments#
Behind the scenes when hatch creates a new virtual environment, by default it uses venv[1] which is the default environment management tool that comes with Python installations.
Hatch will:
Create a new virtualenv (venv) that is located on your computer.
Install your package into the environment in editable mode (similar to
python -m pip install -e). This means it installs both your project and your project’s dependencies as declared in your pyproject.toml file.
Step 2: Build your package’s sdist and wheel distributions#
Once you have your development environment setup, you are ready to build your package using Hatch. Remember that building is the process of turning your Python package file structure into two distribution files:
The wheel distribution is a pre-built version of your package. It useful for users as it can be directly installed using a tool such as
pip. This file has the extension.whl.The source distribution contains the files that make up your package in an unbuilt format. This file will have the extension
.tar.gz.
You will use Hatch as a Front end tool that builds your package’s sdist and wheel using the hatchling build back-end. The hatchling build back-end is used because you declared it in your pyproject.toml file in the previous lesson.
To build your package run hatch build:
➜ hatch build
──────────────── sdist ─────────────────
dist/pyospackage-0.1.tar.gz
──────────────── wheel ─────────────────
dist/pyospackage-0.1-py3-none-any.whl
Learn more about building a Python package
You can learn more about building in the build page of our packaging guide.
The sdist is important if you wish to publish your package to conda-forge. You will learn about this in a later lesson.
Congratulations - you’ve created your Python package distribution files #
You’ve now built your Python package and created your package distribution files. The next step is to setup your account on TestPyPI so you can publish your package.
Step 3. Setup your TestPyPI account#
Next, you’ll setup an account on TestPyPI. Remember that you are using TestPyPI here instead of the real PyPI as a way to safely learn how to publish a package without accidentally “releasing” your package before it’s ready.
TestPyPI vs. PyPI
If you have a package that you are confident belongs on PyPI, all of the steps below will also work for you. When you publish using Hatch, you will call hatch publish to publish directly to PyPI instead of hatch publish -r test which publishes to TestPyPI.
Create an account if you don’t already have one. Be sure to store your password in a safe place!
Once you have an account setup, login to it.
Search on https://test.pypi.org/ (and also on https://pypi.org/) to ensure that the package name that you have selected doesn’t already exist. If you are using our test pyosPackage, then we suggest that you add your name or GitHub username to the end of the package name to ensure it’s unique.
Example: pyosPackage_yourNameHere.
How to rename your Python package if the name is already taken in (test) PyPI
Required
Search your publishing location(s) to make sure your new name isn’t taken (TestPyPI, PyPI, conda-forge)
Update the project name in your pyproject.toml file (e.g.
name = "pyospackage_yourNameHere")Update the module folder name to be the same (e.g.
src/pyospackage_yourNameHere)Rebuild your project (
hatch build)Publish your package to capture the name (continue this tutorial!)
Recommended
Update the GitHub repository name to align with the new package name
Update your local project folder to match the new package name (e.g.
pyospackage_yourNameHere/src)Update mentions of your repository name in other files (e.g.
README.md)

Before you try to upload to TestPyPI, check to see if the name of your package is already taken. You can do that using the search box at the top of the TestPyPI website.#
Setup 2-factor (2FA) authentication
2-factor authentication is a secure login process that allows you to use a backup device that only you can access to validate that the person logging in is really you. It addresses the issue of password phishing where someone else gains access to a password and can login to your account.
This matters on PyPI because someone could login to your account and upload a version of your package that has security issues. These issues will then impact all of your users when they download and install that version of the package.
2-factor authentication is required for PyPI authentication as of 1 January 2024.
Step 4. Create a package upload token#
To upload your package to TestPyPI (or PyPI), you will need to create a token for your account first, and should then create a package-specific token. (If you completed this step previously, you can reuse the tokens when you upload your package again.)
Why create package-specific tokens?
It’s ideal to create a package-specific token. When you create an account-wide token this allows anyone with access to the account to then access all of your TestPyPI (or PyPI) projects. By creating a package-specific token, you are limiting the scope of the token to only your specific package. This is just a safe way to set things up for you particularly if you are collaborating with others on package development.
Follow the steps below to create your token#
Login to TestPyPI and go to your account settings
Scroll down to the API tokens section
Click on the Add API Token button
If you are new to using TestPyPI and don’t have any packages there yet, OR if you have other packages on TestPyPI but are uploading a new package, you will need to create an account-wide token.
When you create your token, be sure to copy the token value and store it in a secure place before closing that browser.
Your token should look something like this:
pypi-abunchofrandomcharactershere...
It should start with pypi followed by a dash and a bunch of characters.
Upload to TestPyPI using Hatch#
Once you have your token, you are ready to publish to TestPyPI.
Run
hatch publish -r test
-r stands for repository. In this case because you are publishing to TestPyPI you will use -r test. Hatch will then ask for a username and credentials.
Add the word
__token__for your username. This tells TestPyPI that you are using a token value rather than a username.Paste your TestPyPI token value in at the
Enter your credentialsprompt:
❯ hatch publish -r test
Enter your username: __token__
Enter your credentials: <paste-your-token-value-here>
dist/pyospackage-0.1-py3-none-any.whl ... already exists
dist/pyospackage-0.1.tar.gz ... already exists
If your credentials are valid, and you have already run hatch build
and thus have your 2 distribution files in a dist/ directory then
Hatch will publish your package to TestPyPI.
Hatch also has a caching system so once you enter your credentials it will remember them.
Install your package from TestPyPI#
Once your package upload is complete, you can install it from TestPyPI. You can find the installation instructions on the TestPyPI landing page for your newly uploaded package.
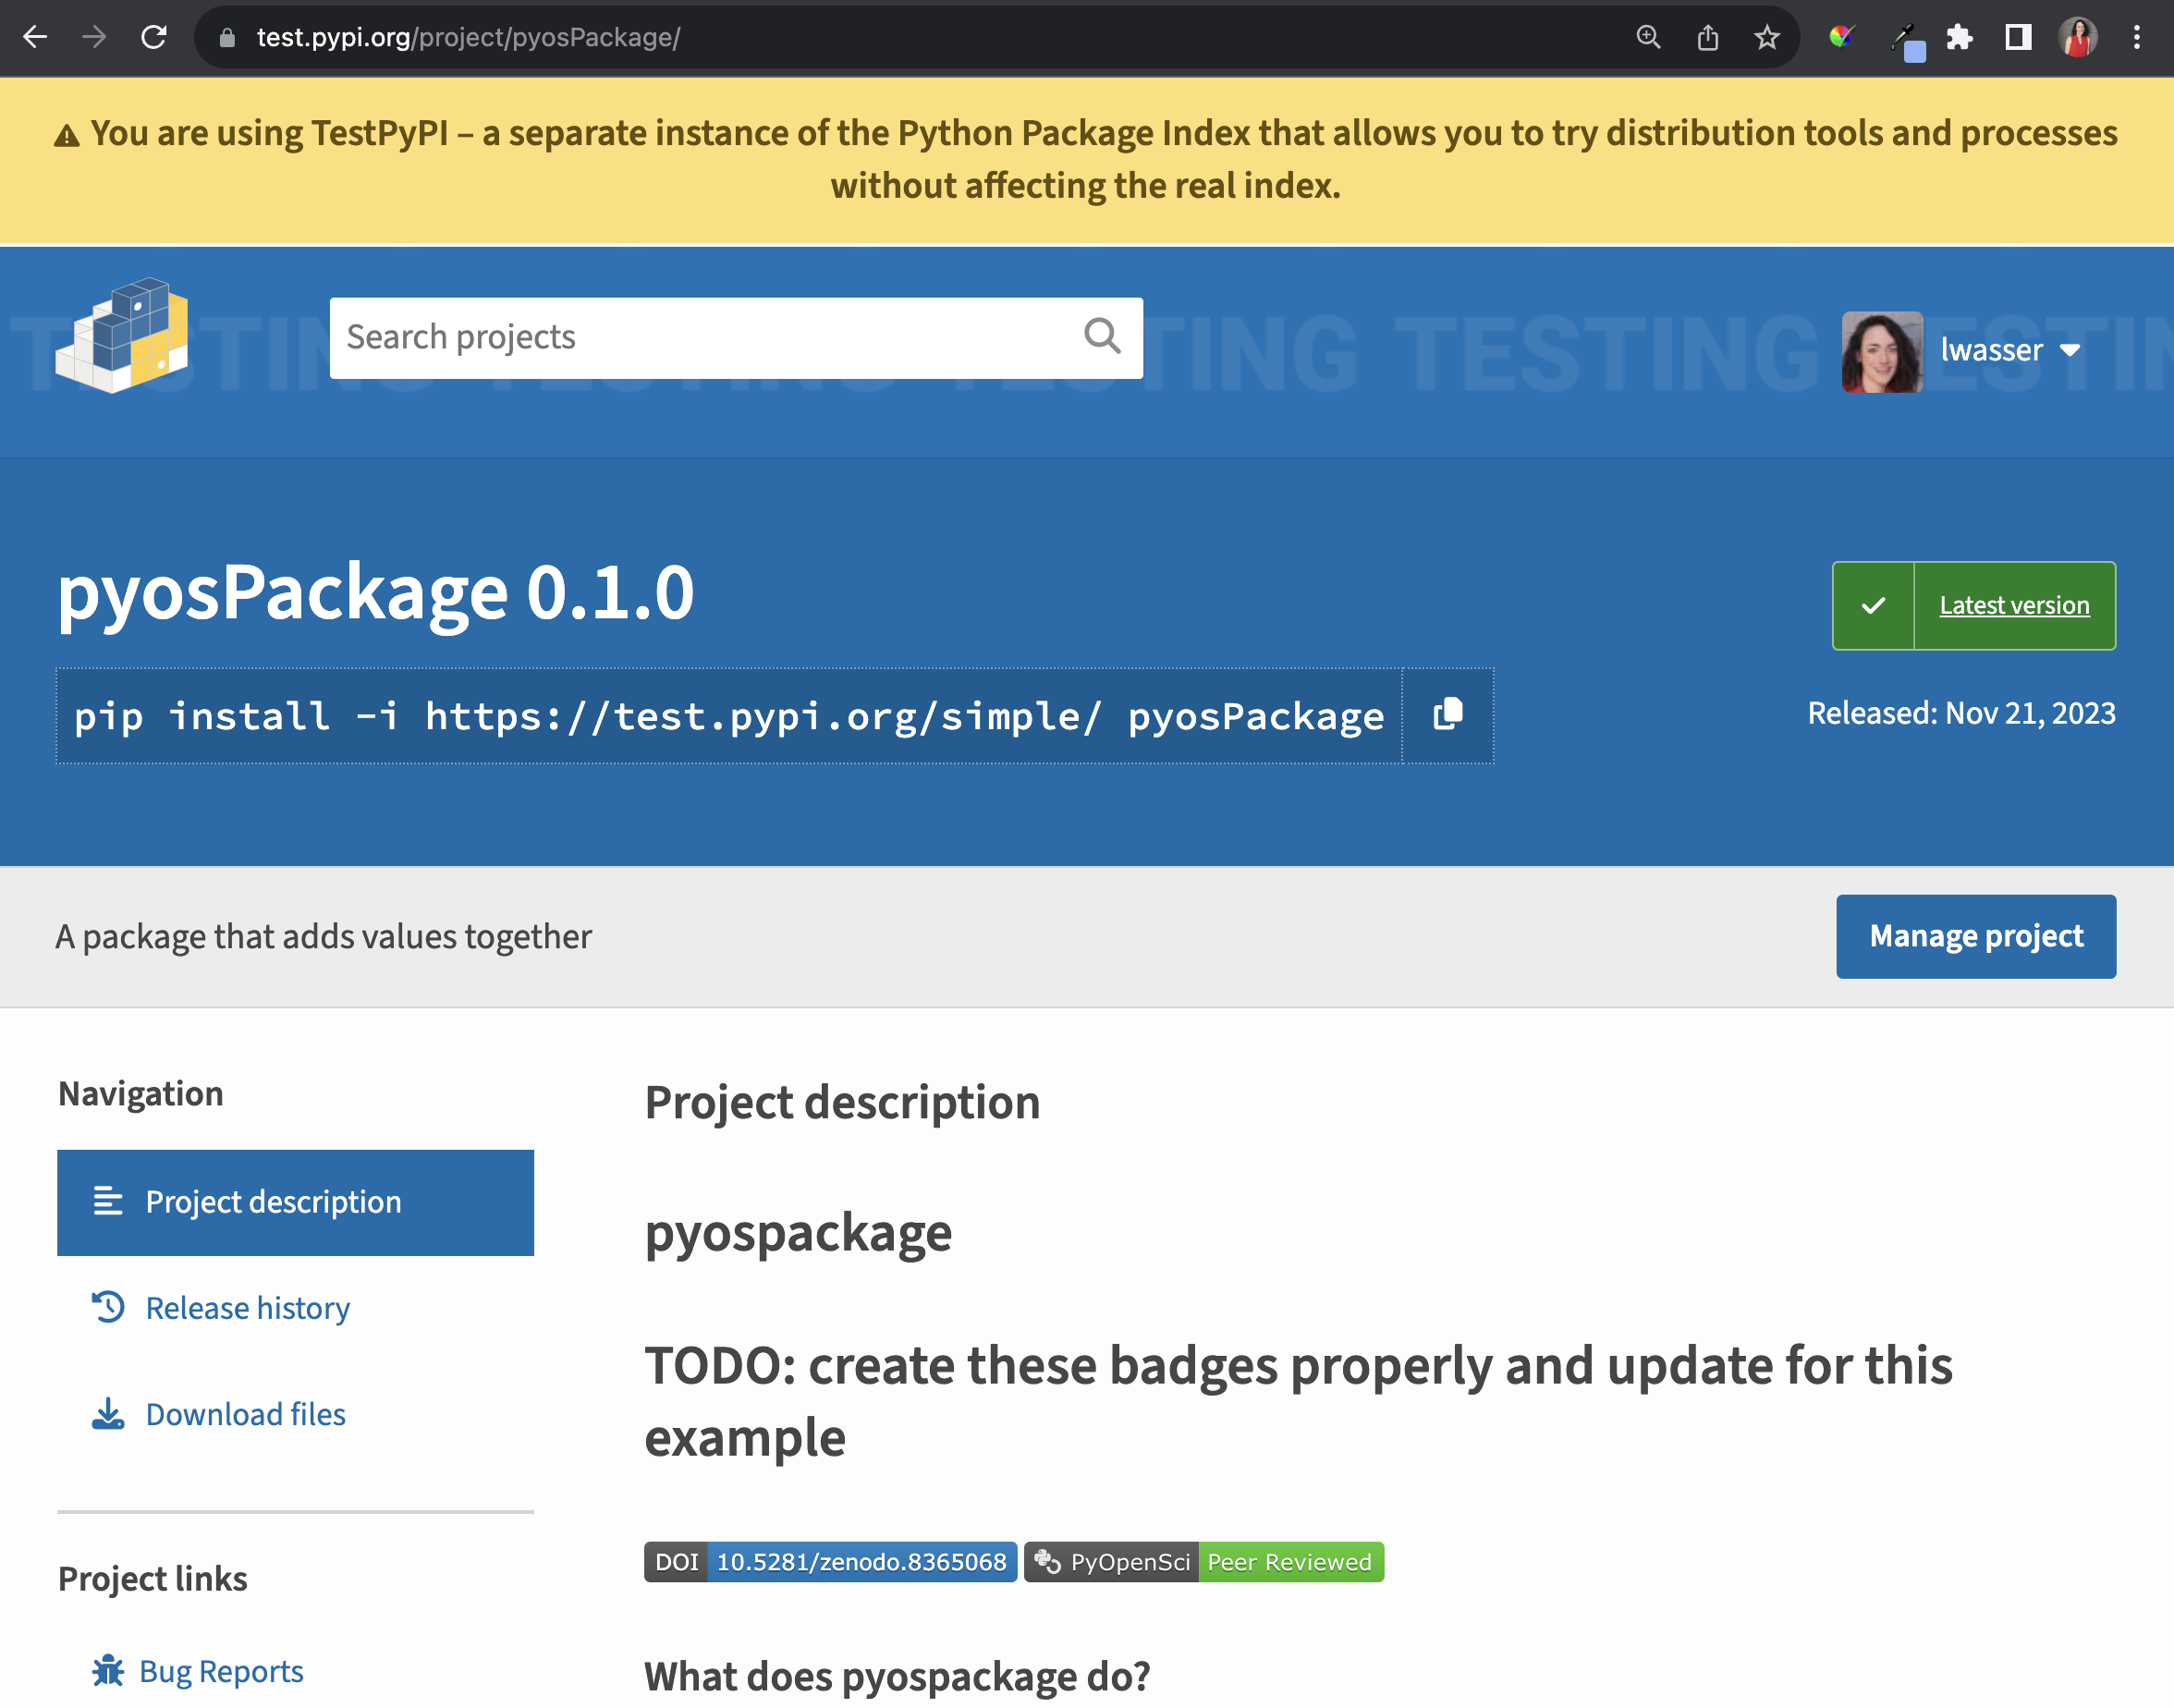
This is an example landing page for the pyosPackage that was just uploaded. Notice at the top of the page there are instructions for how to install the package from TestPyPI. You can simply copy that code and use it to install your package from TestPyPI locally.#
As an example, check out our pyOpenSci pyosPackage landing page on TestPyPI. Notice that the page has information about the current package version and also installation instructions as follows:
python -m pip install -i https://test.pypi.org/simple/ pyosPackage
Important
Publishing to TestPyPI vs PyPI While you can install from TestPyPI it’s not recommended that you publish to TestPyPI as a permanent way to install your package. In fact, you cannot, because TestPyPI may delete accounts after a time. TestPyPI is a perfect place to learn how to publish your package and test the installation process. But your end goal should be to publish to PyPI once you have figured out your workflow and your package is ready to deploy.
Time to install your package#
On your computer, activate the development environment that you wish to install your newly published package in.
Run the installation instructions for your package from TestPyPI.
> conda activate pyospkg-dev
> pip install -i https://test.pypi.org/simple/ youPackageNameHere
> conda list
> hatch shell
> pip install -i https://test.pypi.org/simple/ youPackageNameHere
> pip list
The value of end-to-end tools like hatch, flit and poetry
In this lesson you are using Hatch and hatchling to create, build and publish your Python package. Click here to learn about other packaging tools in the ecosystem.
Package-specific token vs trusted publisher#
For long run maintenance of your package, you have two options related to PyPI publication.
You can create a package-specific token which you will use to publish your package (manually) to PyPI. This is a great option if you don’t wish to automate your PyPI publication workflow.
You can also create an automated publication workflow on GitHub using GitHub Actions. This is a great way to make the publication process easier and it also supports a growing maintainer team. In this case we suggest you don’t worry about the token and instead setup a specific GitHub Actions that publishes your package when you make a release. You can then create a “trusted publisher” workflow on PyPI.
Trusted Publishing
While publishing from GitHub Action is possible using tokens, we recommend the Trusted Publishing approach as it also confers significant security and usability benefits.
On the usability front, when Trusted Publishing is enabled, users no longer need to manually create API tokens on PyPI and store them in the GitHub release workflow.
On the security front, Trusted Publishing reduces a risk related to the API token being long lived: with API tokens, as soon as an attacker gets access to it, they can publish many packages and versions in your name (depending on the scope of the token), until you discover the token compromise and rotate the credential. Trusted Publishing avoids this problem by minting very short lived tokens which expire automatically.
For these benefits, it is recommended that users use only the GitHub Actions release workflow to publish packages.
You will learn how to create the automated trusted publisher workflow in a followup lesson.
OPTIONAL: If you want to use a manual token-based publication workflow#
If you plan to use your token regularly to publish to PyPI, we strongly recommend going through the above steps again to create a token specific to your new package.
To do this:
Go to TestPyPI.
Navigate to the “Your Projects” section of your account
Click on the manage button for the project that you wish to add a token for
Go to settings
Click on “Create a token for your-package-name-here”
Create the token and follow the steps above publish your package using the repository specific token.
And you’re all done!
Trusted Publishing instead of token-based publication
Trusted Publishing will generate short lived tokens, scoped to the project, on demand, only when a specific release workflows gets triggered. This solves all the security and usability issues associated with storing credentials in files/GitHub secrets.
You have published your package to TestPyPI!#
Congratulations. You have now successfully published your package to TestPyPI. If you have a package that is ready for real-world use on the real PyPI, then you can follow the same steps (with the differences noted above) to publish it on PyPI.
Once you publish on PyPI, you can then easily add your package to the conda-forge ecosystem using the grayskull tool.
You will learn how to do that in the next lesson.