Python Package Code Style, Format and Linters#
Take Aways
pyOpenSci requires authors to follow PEP 8 code format guidelines
Setting up a code formatters like Black and isort will help you enforce PEP 8 style guidelines and also consistent, readable code format
Some commonly used tools are: Black, Isort, flake8, Ruff
You can also setup pre-commit hooks which will run code formatters locally each time you make a commit.
precommit.ci is a bot that you can add to your GitHub repository. It will automagically apply code format to every PR using the tools specified in your pre-commit-config.yaml file. It can save significant time and make contributions easier for new contributors.
Automation is good! By making code quality tools care of your code, you can focus on structural and high values tasks.
Consistent code format and style is useful to both your package and across the scientific Python ecosystem because using similar formats makes code easier to read.
For instance, if you saw a sentence like this one without any spaces, or punctuation, it would take your brain longer to process it.
forinstanceifyousawasentencelikethisonewithoutany...
pyOpenSci peer review process requires that you to follow standard Python PEP 8 format rules as closely as you can.
pyOpenSci doesn’t require you to use a specific code format tool. However, we do look for consistency and readability in code style. Below you will find a discussion of:
The benefits of using linters and code format tools in your workflow
Some commonly used tools in the scientific Python space
Setting up pre-commit hooks and the pre-commit.ci bot to make using code format tools in daily workflows and in pull requests on GitHub easier.
Use a code format tool (or tools) to make your life easier#
We suggest that you use a code format tool, or a set of format tools, because manually applying all of the PEP 8 format specifications is both time consuming for maintainers and can be a road block for potential new contributors. Code formatters will automagically reformat your code for you, adhering to PEP 8 standards and applying consistent style decisions throughout.
Setting up a code format suite of tools will:
Save you and your maintainer team time in fixing PEP 8 inconsistencies.
Ensure that format and style is consistent across your entire code-base.
Avoid lengthy discussions with contributors and other maintainers about personalized code format preferences during reviews.
Avoid pure visual edits in the code base so that code reviews focus on added value
Many packages use a suite of tools to apply code format rules, taking the work out of manually implementing code format requirements.
Consistent code format across packages within the (scientific) Python ecosystem, will also broadly make code easier to scan, understand and contribute to.
Linting vs. format and style#
Before we dive in let’s get a few definitions out of the way.
Code linting#
A code linter is a tool that will review your code and identify errors or issues. A linter typically does not modify your code. It will tell you what the error is and on what line it was discovered. Flake8, discussed below, is an example of a commonly-used code linter.
Code formatters (and stylers)#
Code formatters will reformat your code for you. Python focused code formatters often follow PEP 8 standards. However, they also make stylistic decisions about code consistency.
Black is an example of a commonly-used code formatter. Black both applies PEP 8 standards while also making decisions about things like consistent use of double quotes for strings, and spacing of items in lists.
You will learn more about Black below.
Code linting, formatting and styling tools#
Black#
Black is a code formatter. Black will automagically (and unapologetically) fix spacing issues and ensure code format is consistent throughout your package. Black also generally adheres to PEP 8 style guidelines with some exceptions. A few examples of those exceptions are below:
Black defaults to a line length of 88 (79 + 10%) rather than the 79 character
PEP 8specification. However, line length is a setting can be manually overwritten in your Black configuration.Black will not adjust line length in your comments or docstrings.
This tool will not review and fix import order (you need
isortorruffto do that - see below).
Tip
If you are interested in seeing how Black will format your code, you can use the Black playground
Using a code formatter like Black will leave you more time to work on code function rather than worry about format.
Flake8#
To adhere to Python pep8 format standards, you might want to add
flake8 to your code format
toolbox.
flake8 will:
Flag every line in your code that extends beyond 79 characters (including those in docstrings and comments)
Flag spacing issues that conflict with PEP 8 guidelines such as missing spaces after commas
Flake8 also flags unused imports and unused declared variables in your modules.
Below you can see the output of running
flake8 filename.py at the command line for a Python file within a package
called stravalib.
The line length standard for PEP 8 is 79 characters.
Notice that flake8 returns a list of issues that it found in the model.py module on the command line. The Python file itself is not modified. Using this output, you can fix each issue line by line manually.
(stravalib-dev) username@computer stravalib % flake8 stravalib/model.py
stravalib/model.py:8:1: F401 'os' imported but unused
stravalib/model.py:29:80: E501 line too long (90 > 79 characters)
stravalib/model.py:34:80: E501 line too long (95 > 79 characters)
stravalib/model.py:442:80: E501 line too long (82 > 79 characters)
stravalib/model.py:443:39: E231 missing whitespace after ','
stravalib/model.py:493:20: E225 missing whitespace around operator
stravalib/model.py:496:80: E501 line too long (82 > 79 characters)
Isort#
Python imports refer to the Python packages that a module in your package requires. Imports should always be located at the top of each Python module in your package.
PEP 8 has specific standards for the order of these imports. These standards are listed below:
Imports should be grouped in the following order:
Standard library imports.
Related third party imports.
Local application/library specific imports.
While flake8 will identify unused imports in your code, it won’t
fix or identify issues with the order of package imports.
isort will identify where imports in your code are out of
order. It will then modify your code, automatically reordering
all imports. This leaves you with one less thing to think about when cleaning
up your code.
Example application of isort#
Code imports before isort is run:
Below, the pandas is a third party package, typing is a core Python
package distributed with Python, and examplePy.temperature is a first-party
module which means it belongs to the same package as the file doing the import.
Also notice that there are no spaces in the imports listed below.
from typing import Sequence

import pandas

from examplePy.temperature import fahrenheit_to_celsius
From the project root, run:
isort src/examplePy/temporal.py
Python file temporal.py imports after isort has been run
from typing import Sequence

import pandas

from examplePy.temperature import fahrenheit_to_celsius
Ruff#
Ruff is a new addition to the code quality
ecosystem, gaining some traction since its release. ruff is both a linter
and a code formatter for Python, aiming to replace several tools behind a single
interface. As such, ruff can be used at a replacement of all other tools
mentioned here, or in complement to some of them.
ruff has some interesting features that distinguish it from other linters:
Linter configuration in
pyproject.tomlSeveral hundred rules included, many of which are automatically fixable
Rules explanation, see F403 for an example
Fast execution time, makes a quick feedback loop possible even on large projects.
Here is a simple configuration to get started with ruff. It would go into your pyproject.toml:
[tool.ruff]
select = [
    "E", # pycodestyle errors
    "W", # pycodestyle warnings
    "F", # pyflakes. "E" + "W" + "F" + "C90" (mccabe complexity) is equivalent to flake8
    "I", # isort
]
Depending on your project, you might want to add the following to sort imports correctly:
[tool.ruff.isort]
known-first-party = ["examplePy"]
How to use code formatter in your local workflow#
Linters, code formatters and your favorite coding tools#
Linters can be run as a command-line tool as shown above. They also can be run within your favorite coding tool (e.g. VScode, pycharm, etc). For example, you might prefer to have tools like Black and isort run when you save a file. In some editors you can also setup shortcuts that run your favorite code format tools on demand.
Use pre-commit hooks to run code formatters and linters on commits#
You can also setup a pre-commit hook in your Python package repository.
A pre-commit hook is a tool that allows an action (or actions) to be triggered when you apply a commit to your git repository.
Pre-commit hook example workflow#
The precommit workflow looks like this: You type and run:
git commit -m "message here" at the command line
Once you hit return, pre-commit will run any tools that you have configured in a .pre-commit-config.yaml file.
If the tools configured in the pre-commit hook run successfully without making changes or finding errors in your code, the commit will be applied to the repository.
If the tools configured in the hook find errors in your files, the commit will NOT be applied to the repository. Remember from the discussion above that a code formatter like Black will run and reformat your code. A linter like flake8 will provide you with some output that details where there are syntax issues in your code. You will then need to fix those issues, manually.
Once all of the fixes are applied you can re-add (stage) the files to be commit. And re-run your commit.
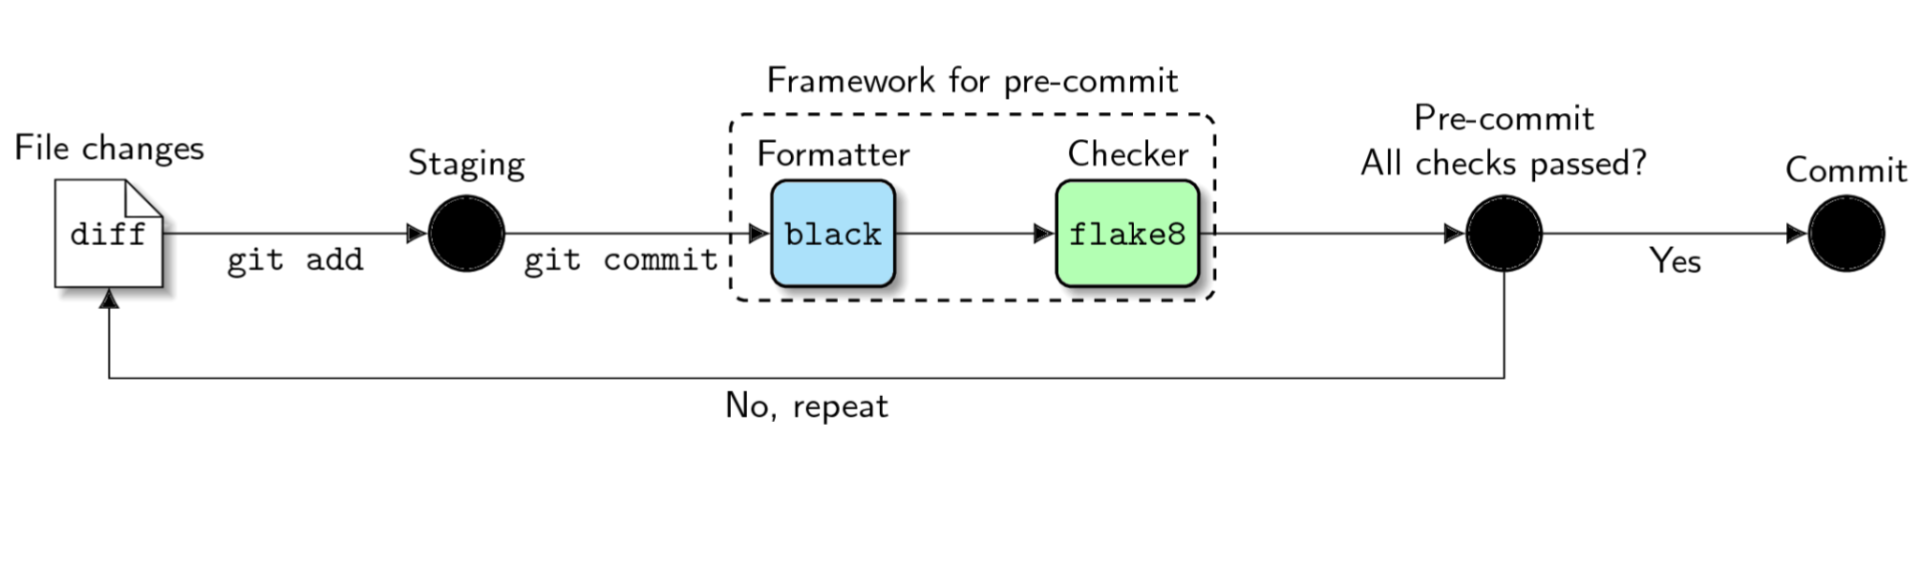
The pre-commit workflow begins with you adding files that have changes to be staged in git. Next, you’d run git commit. When you run git commit, the pre-commit hooks will then run. In this example, Black, the code formatter and flake8, a linter both run. If all of the files pass Black and flake8 checks, then your commit will be recorded. If they don’t, the commit is canceled. You will have to fix any flake8 issues, and then re-add / stage the files to be committed. Image Source#
Important
If have a Python code-base and multiple maintainers actively working on the code, and you intend to run a tool like Black, be sure to coordinate across your team. An initial commit that applies Black to your entire package will likely change a significant amount of your code. This could lead to merge conflicts on open and new PR’s before the new changes are merged.
General pre commit checks#
In addition to calling tools, Pre-commit also has a suite of built in format
hooks that
you can call. Some, such as trailing-whitespace can be also useful to add
to your pre-commit workflow to ensure clean, streamlined code files.
An example pre-commit-config.yaml file is below with examples of how this is all setup.
Pre-commit.ci#
Pre-commit.ci is a bot that may become your new best friend. This bot, when setup on a repo can be configured to do the following:
It will check every pull request using all of the pre-commit hook setting
If you wish, it will also submit a pull request to your repo with pre-commit fixes, saving you, and new contributors the time of reformatting a pr that has format issues.
You can also call the bot on any pull request to run / and fix the code.
The pre-commit.ci bot uses the same pre-commit-config.yaml file that you use to setup pre-commit locally.
Setting up a bot like this can be valuable because:
It can make is easier for maintainers as they no longer have to worry at allows about fixing code format. The bot will do the work for them.
It can make it easier for new comers as they never have to setup pre-commit locally or worry about linting their code. They can even make small fixes to the code directly on GitHub without worry.
Setting up a git pre-commit hook#
To setup pre-commit locally, you need to do 3 things:
Install pre-commit (and include it as a development requirement in your repository)
python -m pip install pre-commit

# or

conda install -c conda-forge pre-commit
Create a .pre-commit-config.yaml file in the root of your package directory.
Below is an example .pre-commit-cofig.yaml file that can be used to setup the pre-commit hook and the pre-commit.ci bot if you chose to implement that too.
repos:
  - repo: https://github.com/PyCQA/isort
    rev: dac090ce4d9ee313d086e2e89ab1acb8c2664fa1 # frozen: 9.0.0a3
    hooks:
      - id: isort
        files: \.py$
  # Misc commit checks using built in pre-commit checks
  - repo: https://github.com/pre-commit/pre-commit-hooks
    rev: 3e8a8703264a2f4a69428a0aa4dcb512790b2c8c # frozen: v6.0.0
    # ref: https://github.com/pre-commit/pre-commit-hooks#hooks-available
    hooks:
      # Autoformat: Makes sure files end in a newline and only a newline.
      - id: end-of-file-fixer
      # Lint: Check for files with names that would conflict on a
      # case-insensitive filesystem like MacOS HFS+ or Windows FAT.
      - id: check-case-conflict
      - id: trailing-whitespace
  # Linting: Python code (see the file .flake8)
  - repo: https://github.com/PyCQA/flake8
    rev: c48217e1fc006c2dddd14df54e83b67da15de5cd # frozen: 7.3.0
    hooks:
      - id: flake8
  # Black for auto code formatting
  - repo: https://github.com/psf/black
    rev: c6755bb741b6481d6b3d3bb563c83fa060db96c9 # frozen: 26.3.1
    hooks:
      - id: black
        language_version: python3.10
# Tell precommit.ci bot to update code format tools listed in the file
# versions every quarter
# The default it so update weekly which is too many new pr's for many
# maintainers (remove these lines if you aren't using the bot!)
ci:
  autoupdate_schedule: quarterly
This file specifies a hook that will be triggered automatically before each git commit,
in this case, it specifies a flake8 using version 6.0.0.
Install your pre-commit hook(s) using
pre-commit install. This will install all of the hooks specified in the pre-commit yaml file into your environment.
Once you have done the above, you are ready to start working on your code.
Pre-commit will run every time you run git commit.
Summary#
pyOpenSci suggests setting up a linter and a code styler for your package, regardless of whether you use pre-commit hooks, CI or other infrastructure to manage code format. Setting up these tools will give you automatic feedback about your code’s structure as you (or a contributor) write it. And using a tool like black that format code for you, reduce effort that you need to make surrounding decisions around code format and style.