PythonパッケージをPyPIに対応させる - pyproject.toml#
In the installable code lesson, you learned how to add
the bare minimum information to a pyproject.toml file to make it
installable. You then learned how to publish a bare minimum version of your
package to PyPI.
それに続いて、あなたは以下の追加方法を学びました:
プロジェクトディレクトリのルートに。
To enhance the visibility of your package on PyPI and provide information
about its development status and maintainers, you should add additional
metadata to your pyproject.toml file. This lesson will guide you through
the process.
学習目標
このレッスンで学ぶこと:
pyproject.tomlファイルの詳細と、パッケージに関するさまざまな種類のメタデータを格納するためにどのように使用されるかについてユーザーがPyPIでプロジェクトを見つけ、理解しやすくするために、プロジェクトに関する情報 (メタデータ) を宣言する方法。
pyproject.toml フォーマットについて詳しく知りたい方は、 こちらのページをご覧ください。
レッスンのポイントはこちら
pyproject.tomlファイルを作成する際、以下を考慮してください:
Python パッケージをインストールして公開するために必要なメタデータテーブルは 2 つだけです:
[build-system]
[project].
[project] テーブルには、パッケージのメタデータが格納されます。 [project] テーブルの中で、 必須 フィールドは2つだけです:
name=
version=
ユーザーがPyPIであなたのプロジェクトを見つけやすくなるので、
[project]テーブルにもっとメタデータを追加するべきです。また、インストーラがあなたのパッケージのインストール方法を理解しやすくなります。[project] テーブルに分類を追加するときは、 PyPIの分類ページ にある有効な値のみを使用してください。 ここで無効な値を指定すると、パッケージをビルドするときやPyPIに公開するときにエラーが発生します。
pyproject.tomlファイル内のテーブルには特定の順番はありません。 しかし、フィールドは正しいテーブルに配置する必要があります。 例えばrequires =は常に [build-system] テーブルにある必要があります。[build-system] テーブルを
pyproject.tomlファイルの先頭に含めることをお勧めします。
pyproject.tomlファイルとは何ですか?#
pyproject.toml ファイルは人間や機械が読めるファイルで、Pythonパッケージの主要な設定ファイルとして機能します。
Tip
パッケージのビルド は、PyPIに公開するために必要な配布ファイルを作成するステップです。
.toml フォーマットについて#
The pyproject.toml file is written in TOML format. TOML is an
easy-to-read structure that is based on key/value pairs. Each section in the
pyproject.toml file contains a [table identifier]. The TOML format can be
compared to other structured formats such as .json.
以下に [build-system] テーブルを示す。そのテーブルの中には、2つのキーと値のペアが必要です。
requires = がキーで、値は角括弧 [] で指定された [build-system] 配列内の ["hatchling"] です。
[build-system] # <- This is a table
requires = ["hatchling"]
# The build backend defines the tool that should be used to build your package distribution files.
build-backend = "hatchling.build"
pyproject.tomlは何に使うのですか?#
pyproject.tomlファイルは、ビルドツールに次のように指示します:
what Build backend to use to build your package (we are using Hatchling in this tutorial but there are many others to choose from).
how and where to retrieve your package's version:
静的 ここで、バージョン
version = "0.1.0"または動的 このツールは、現在のバージョンを決定するために、履歴の最新のタグを検索します。
what Dependencies your package needs,
it can also declare Python-version requirements if your package has them.
また、 pyproject.toml ファイルを使うことで、GitHub リポジトリを閲覧している人が次のようなパッケージの構造をすぐに理解できるようになります:
パッケージの作り方、
サポートするPythonのバージョンとオペレーティングシステム
何をするのか?
誰がメンテナンスするのか
最後に、pyproject.tomlファイルは、静的タイプチェッカー (mypyなど) やコードフォーマッタ/リンタ (blackやruffなど) のようなツールを設定するためにもよく使われます。
Tip
他のツールのビルド設定の設定に興味があれば、 PyPAのドキュメント をチェックしてください。
ビルドツールによっては、プロジェクトのメタデータを保存する方法が異なる場合があります。そのため、Hatch とhatchling以外のツールを使用する場合は、それらのドキュメントを参照することをお勧めします。このチュートリアルでは、PyPAのルールとガイドラインに準拠したツールであるhatchlingとhatchを選択しました。
pyproject.tomlのメタデータはどのように使用されますか?#
pyproject.tomlファイルは、PyPIに公開されるPythonの配布ファイルに含まれる METADATA を生成するためにビルドツールが使用するファイルです。 この METADATA ファイルは、PyPI によってあなたのパッケージの PyPI ランディングページに入力され、そこで公開されている何万ものパッケージの中からユーザをフィルタリングするのに使われます。
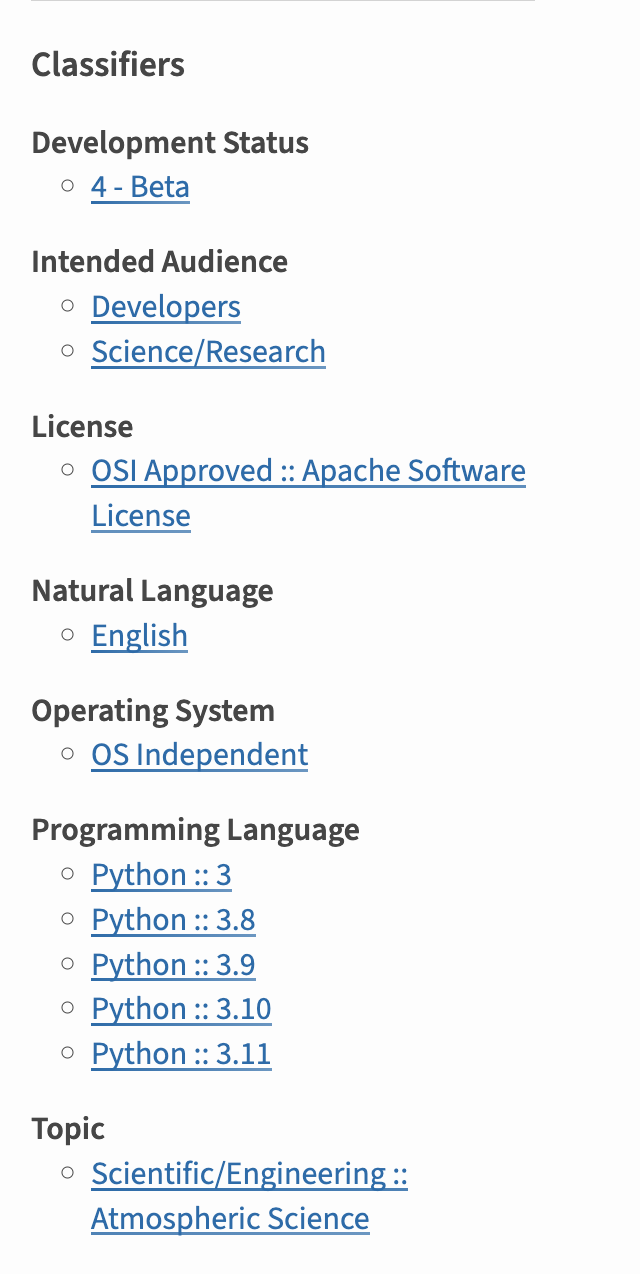
pyproject.tomlにclassifierセクションを追加してパッケージがビルドされると、ビルドツールはメタデータをPyPIが理解できる形式に整理し、PyPIのランディングページに表示します。 これらの分類子により、ユーザはサポートするpythonのバージョンやカテゴリなどでパッケージをソートすることもできます。#
pyproject.tomlファイルを更新する方法#
最後のレッスンでは、パッケージのビルドに必要なコア要素を含む、素のpyproject.tomlファイルを作成しました:
プロジェクトのバックエンドビルドツールを定義した
[build-system]テーブル (hatchling)プロジェクトのバージョンと名前を定義した
[project]テーブル。
あなたが作成した pyproject.toml ファイルは次のようなものです:
[build-system]
requires = ["hatchling"]
build-backend = "hatchling.build"

[project]
name = "pyospackage"
version = "0.1.0"
次のステップでは、PyPI であなたのパッケージを見つけるのに役立ち、またあなたのパッケージの範囲をよりよく説明するために、推奨されるメタデータフィールドを追加します。 一度このメタデータを追加すれば、もう二度と追加する必要はありません。 これらのメタデータ・フィールドが定期的に更新されるのは、あなたが次のようなことをしたときだけです:
パッケージ依存の削除
パッケージがサポートしているPythonのバージョンを変更します。
Hatchlingの詳細
Hatchlingのバックエンドのドキュメントは こちら です。
ステップ2: READMEとライセンスの追加#
In the previous lessons, you added both a README.md file and a LICENSE to your package repository. Once you have those files, you can refer to the README from your pyproject.toml file, and add a short code indicating your choice of LICENSE following the example below.
[build-system]
requires = ["hatchling"]
build-backend = "hatchling.build"
[project]
name = "pyospackage"
version = "0.1.0"
description = """
Tools that update the pyOpenSci contributor and review metadata
that is posted on our website
"""
authors = [
  { name = "Firstname Lastname", email = "email@pyopensci.org"},
  { name = "Secondperson Fullname", email = "email2@pyopensci.org" }
]

maintainers = [
  { name = "Secondperson Fullname", email = "email2@pyopensci.org" },
  { name = "New Friend", email = "newbie@pyopensci.org" }
]
readme = "README.md"
license = "MIT"
Pyproject.tomlファイルのライセンスエントリは、ライセンス式構文を使用する必要があります。多くの場合、これは「MIT」、「BSD -3 - Clause」、「Apache-2.0」など、ライセンスの短い名前(スペースなし)です。より正確には、バージョン2.2以降の互換バージョンのSPDX仕様に記載されているように、有効なSPDXライセンス式である必要があります。
複数のライセンスまたはカスタムライセンスをお持ちの場合は、ライセンス式を使用してこれらを表現することもできます。
ライセンスファイル、または法的情報を含むその他のファイルをパッケージに配布する場合は、[' license - files ']( https://packaging.python.org/en/latest/guides/writing-pyproject-toml/#license-files )エントリを使用してこれらを含めることができますが、これは必須ではありません。
But how do I figure out which Python versions I should support?
良い質問です。Python開発者ガイドには、各Pythonリリースのステータスを説明するステータスページ(および便利な視覚化)が用意されています。Pythonのリリースは、PEP 602 で説明されているいくつかの異なるフェーズを経ています。
バグ修正フェーズでは、最新のPythonリリースを使用することをお勧めします。Pythonリリースがセキュリティフェーズにある場合は、新しいバージョンのPythonに移行することをお勧めします。
When should I use requires-python?
You do not need to specify requires-python for every package. However, if you
know that your package will not work with older versions of Python, use requires-python
to prevent installers from installing it with those versions. For example, if your package
requires features introduced in Python 3.10:
[project]
requires-python = ">=3.10"
This helps pip select a compatible release of your package for the Python version a user is running.
Step 3: Specify dependencies#
Next add your dependencies table to the project table.
The dependencies = section contains a list (or array in the toml language) of
the Python packages that your package requires to run properly in a Python
environment. Similar to the requirements listed in the [build-system]
table above:
[build-system] # <- this is a table
requires = ["hatchling"] # this is an array (or list) of requirements
依存関係は配列(Pythonのリストに似ている)構造で追加されます。
dependencies = ["numpy", "requests", "pandas", "pydantic"]
依存関係は、 バージョン指定子 を使って特定のバージョンに限定することができます。 依存関係の名前の後にバージョン指定子がない場合、あなたのパッケージは依存パッケージのどのバージョンでも使うことができます。 コードは時間の経過とともに変化し、バグが修正され、APIが変更されます。そのため、コードを書いた依存関係がどのバージョンと互換性があるのかを明確にしておくことは良いことです - あなたが今年書いたパッケージは、おそらくnumpy v0.0.1とは互換性がありません!
パッケージバージョンの範囲を指定する様々な方法については、こちらをご覧ください。
最も一般的なバージョン指定子は lower bound で、指定されたバージョンより上位のバージョンを許可します。理想的には、あなたのパッケージとまだ互換性のある最も低いバージョンに設定すべきですが、実際には新しいパッケージの場合、パッケージが書かれた時点での最新バージョンに設定されることがよくあります [1] 。
下限は次のようになります:
dependencies = [ "numpy>=1.0" ]
カンマは、個々の依存関係を区切るために使用します、 そして、dependencies セクションの各パッケージは異なるタイプのバージョン指定子を使うことができます:
dependencies = [
"numpy>=1.0", # Greater than or equal to 1.0
"requests==10.1", # Exactly 10.1
"pandas", # Any version
"pydantic>=1.7,<2" # Greater than or equal to 1.7, but less than 2
]
これで pyproject.toml ファイルは次のようになります:
[build-system]
requires = ["hatchling"]
build-backend = "hatchling.build"

[project]
name = "pyospackage"
version = "0.1.0"
description = """
Tools that update the pyOpenSci contributor and review metadata
that is posted on our website
"""
authors = [
  { name = "Firstname Lastname", email = "email@pyopensci.org"},
  { name = "Secondperson Fullname", email = "email2@pyopensci.org" }
]
maintainers = [
  { name = "Secondperson Fullname", email = "email2@pyopensci.org" },
  { name = "New Friend", email = "newbie@pyopensci.org" }
]
readme = "README.md"
license = "MIT"
dependencies = ["numpy>=1.0", "requests==10.1", "pandas", "pydantic>=1.7,<2"]
依存関係のピン止めは慎重に
依存関係を "Pinning" することは、次のように特定のバージョンに設定することを意味します:
numpy == 1.0 。
他の開発者が依存するライブラリパッケージを構築する場合、正確な依存バージョンに固定する前に慎重にならなければなりません。 本番用ウェブサイトのようなアプリケーションは、他のパッケージがそのプロジェクトに依存しないため、依存関係を固定することが多いです。 なぜなら、ユーザーはあなたのパッケージをさまざまな環境にインストールするからです。特定のバージョンに固定された依存関係は、Python環境の解決をより困難にします。 そのため、依存関係を特定のバージョンに固定するのは、どうしても必要な場合に限られます。
同様に、パッケージの上限を指定する場合にも注意が必要です。これら2つの仕様は同等です:
pydantic>=1.10,<2
pydantic^1.10
依存関係をデフォルトで上限値に固定するビルドツールとして知っておくべきもののひとつに、Poetryがあります。 Poetryで依存関係を安全に追加する方法については、こちらをお読みください。
Step 4: Add PyPI classifiers#
次に、pyproject.tomlファイルに分類子を追加します。 pyproject.toml ファイルに追加する各分類子の値は、 ここにあるPyPIで認められている分類子 の一覧から選ぶ必要があります。スペルや書式に逸脱があると、PyPIに公開するときに問題が発生します。
間違った分類子を使うとどうなりますか?
もし 標準的な分類器の値を使う のでなければ、 PyPIでパッケージを公開しようとすると拒否されます。 最初のトライでPyPIに拒否されても心配しないでください! それは私たち全員に起こったことです。
そのリストを見て、以下の項目を pyproject.toml ファイルに追加します:
開発状況
対象読者
トピック
プログラミング言語サポート
classifierのキーは、下の例のようになるはずです。 いくつか注意点があります:
Your classifier values might be different depending upon your intended audience, development status of your package and the Python versions that you support
指定されたPyPIの分類子の値 を使う限り、好きなだけ分類子を追加できます。
[build-system]
requires = ["hatchling"]
build-backend = "hatchling.build"

[project]
name = "pyospackage"
version = "0.1.0"
description = """
Tools that update the pyOpenSci contributor and review metadata
that is posted on our website
"""
authors = [
  { name = "Firstname Lastname", email = "email@pyopensci.org"},
  { name = "Secondperson Fullname", email = "email2@pyopensci.org" }
]
maintainers = [
  { name = "Secondperson Fullname", email = "email2@pyopensci.org" },
  { name = "New Friend", email = "newbie@pyopensci.org" }
]
readme = "README.md"
license = "MIT"
dependencies = ["numpy>=1.0", "requests==10.1", "pandas", "pydantic>=1.7,<2"]
classifiers = [
"Development Status :: 4 - Beta",
"Intended Audience :: Developers",
"Topic :: Software Development :: Build Tools",
"Programming Language :: Python :: 3 :: Only",
"Programming Language :: Python :: 3.10",
"Programming Language :: Python :: 3.11",
]
分類子は pyproject.toml ファイルでは必須ではありませんが、ユーザーがあなたのパッケージを見つけるのに役立つことに注意してください。そのため、追加することを強くお勧めします。
Step 5: Add the [project.urls] table#
最後に、pyproject.tomlファイルにproject.urlsテーブルを追加します。
project.urls には、プロジェクトに関連するリンクが含まれています。以下を含めるとよいでしょう:
ホームページ: プロジェクトの公開ドキュメントへのリンク。 このチュートリアルを進めているのであれば、このリンクはまだ持っていないかもしれません。 大丈夫、当分は飛ばしてもいいです。
Bug reports: a link to your issues/discussions or wherever you want users to report bugs.
ソース: プロジェクトのGitHub / GitLabリンク。
[build-system]
requires = ["hatchling"]
build-backend = "hatchling.build"

[project]
name = "pyospackage"
version = "0.1.0"
description = """
Tools that update the pyOpenSci contributor and review metadata
that is posted on our website
"""
authors = [
  { name = "Firstname Lastname", email = "email@pyopensci.org"},
  { name = "Secondperson Fullname", email = "email2@pyopensci.org" }
]
maintainers = [
  { name = "Secondperson Fullname", email = "email2@pyopensci.org" },
  { name = "New Friend", email = "newbie@pyopensci.org" }
]
readme = "README.md"
license = "MIT"

dependencies = ["numpy>=1.0", "requests==10.1", "pandas", "pydantic>=1.7,<2"]
classifiers = [
"Development Status :: 4 - Beta",
"Intended Audience :: Developers",
"Topic :: Software Development :: Build Tools",
"Programming Language :: Python :: 3 :: Only",
"Programming Language :: Python :: 3.10",
"Programming Language :: Python :: 3.11",
]
[project.urls] # Optional
"Homepage" = "https://www.pyopensci.org"
"Bug Reports" = "https://github.com/pyopensci/pyosmeta/issues"
"Source" = "https://github.com/pyopensci/pyosmeta/"
Tip
ここに追加できるURLは他にもたくさんある。 概要についてはこちらのREADMEファイル をチェックしてください。
すべてをまとめます - 完成したpyproject.tomlファイル#
以下は、上で説明したすべてのセクションがコメントされた pyproject.toml ファイルの完全な例です。
[build-system]
requires = ["hatchling"]
build-backend = "hatchling.build"

[project]
name = "pyospackage"
version = "0.1.0"
description = """
Tools that update the pyOpenSci contributor and review metadata
that is posted on our website
"""
authors = [
  { name = "Firstname Lastname", email = "email@pyopensci.org"},
  { name = "Secondperson Fullname", email = "email2@pyopensci.org" }
]
maintainers = [
  { name = "Secondperson Fullname", email = "email2@pyopensci.org" },
  { name = "New Friend", email = "newbie@pyopensci.org" }
]
readme = "README.md"
license = "MIT"

dependencies = ["numpy>=1.0", "requests==10.1", "pandas", "pydantic>=1.7,<2"]

classifiers = [
    "Development Status :: 4 - Beta",
    "Intended Audience :: Developers",
    "Topic :: Software Development :: Build Tools",
    "Programming Language :: Python :: 3 :: Only",
    "Programming Language :: Python :: 3.10",
    "Programming Language :: Python :: 3.11",
]
[project.urls] # Optional
"Homepage" = "https://www.pyopensci.org"
"Bug Reports" = "https://github.com/pyopensci/pyosmeta/issues"
"Source" = "https://github.com/pyopensci/pyosmeta/"
付録 - 完全にコメントされたpyproject.tomlファイルを見るにはクリックしてください
参考にしたいのであれば、以下は、完全にコメントされたpyproject.tomlファイルです。
# You can delete all of the comments once you have created your own pyproject.toml file.

# The build system table. Here we use hatchling as the build back end tool.
[build-system]
requires = ["hatchling"]
build-backend = "hatchling.build"

# The [project] section contains your package's metadata
# notice that the version is setup to be dynamically generated using dynamic=[“version”]

[project]
name = "pyospackage"
# dynamic = ["version"] # you will learn how to dynamically set the version in a future lesson
version = "0.1.0" # manually assign version (not preferred)
description = "Tools that update the pyOpenSci contributor and review metadata that is posted on our website"
authors = [{ name = "Firstname lastname", email = "email@pyopensci.org" }]

# maintainers section is optional but suggested.
maintainers = [
    { name = "firstname lastname", email = "admin@pyopensci.org" }, # Optional
]

# Classifiers have set values - be sure to only use classifier values from the
# PyPI page here: https://PyPI.org/classifiers/

classifiers = [
    # How mature is this project? Common values are
    #   3 - Alpha
    #   4 - Beta
    #   5 - Production/Stable
    "Development Status :: 4 - Beta",

    # Indicate who your project is intended for
    "Intended Audience :: Developers",
    "Topic :: Software Development :: Build Tools",

    # Specify the Python versions ensuring that you indicate you support Python 3.
    # this is only for PyPI and other metadata associated with your package - for your users to see
    "Programming Language :: Python :: 3 :: Only", # BE sure to specify that you use python 3.x
    "Programming Language :: Python :: 3.10",
    "Programming Language :: Python :: 3.11",
]


dependencies = ["numpy>=1.0", "requests==10.1", "pandas", "pydantic>=1.7,<2"]
# This is the metadata that pip reads to understand what versions your package supports
readme = "README.md"

# Pick your license using the license expression syntax specified here:
# https://packaging.python.org/en/latest/specifications/license-expression/
# We suggest MIT, BSD-3-Clause or Apache-2.0
license = "MIT"

# Add urls for your home page, issue tracker and source code
[project.urls] # Optional
"Homepage" = "https://www.pyopensci.org"
"Bug Reports" = "https://github.com/pyopensci/pyospackage/issues"
#"Funding" = ""
"Source" = "https://github.com/pyopensci/pyospackage"
例 pyproject.toml ファイル#
以下は、scientificとpyOpenSciエコシステムの様々なパッケージの pyproject.toml ファイルの例です。
まとめ#
この時点であなたは以下を作成しました:
パッケージの README.md ファイル
ユーザーコミュニティをサポートする CODE_OF_CONDUCT.md ファイル
LICENSE ファイルは、人々があなたのソフトウェアをどのように使用できるか、また使用できないかに関する法的な境界線を提供します。
また、 パッケージを(test)PyPIに公開する方法 も学びました。
新しいバージョンのパッケージをPyPIに公開する#
これで、Pythonパッケージの新しいバージョンを(test)PyPIに公開する準備ができました。 そうすると、パッケージのランディングページに、より多くの情報が掲載されていることがわかります。
今すぐ再公開を試みます。
まず、pyprojectのtomlファイルでパッケージのバージョンを更新します。以下のバージョンが 0.1 から 0.1.1 に更新されました。
[build-system]
requires = ["hatchling"]
build-backend = "hatchling.build"

[project]
name = "pyospackage"
version = "0.1.1"
次に hatch を使って、新しいバージョンのパッケージを test.PyPI.org に公開します。
> hatch publish -r test
次のステップ(オプション) - conda-forgeに公開します。#
これであなたのパッケージをPyPIに公開するために必要なスキルはすべて揃いました。
あなたのパッケージを(condaエコシステム内のチャンネルである)conda-forgeで公開したい場合 、 その方法は次のレッスンで学びます。