Create a pure Python package#
このレッスンについて
This lesson uses the pyOpenSci Python package copier template to create a Python package quickly. Your package will be installable both locally and remotely from a website such as GitHub (or GitLab) into a Python environment.
In this lesson, you will learn:
How to make your code installable into any Python environment, both locally and from GitHub
How to update a pyproject.toml file, which contains the metadata needed to build, install, and publish your package.
How to declare a Build backend which will be used to build and install your package
インタラクティブな開発のために編集可能モードでパッケージをインストールする方法
このレッスンを完了するために必要なもの
To complete this lesson, you will need a local Python environment and shell on your computer. You will need to have Copier and Hatch installed to complete the lesson successfully.
If you are using Windows or are not familiar with Shell, you may want to check out the Carpentries shell lesson[1]. Windows users will likely need to configure a tool such as gitbash for any Shell and git-related steps.
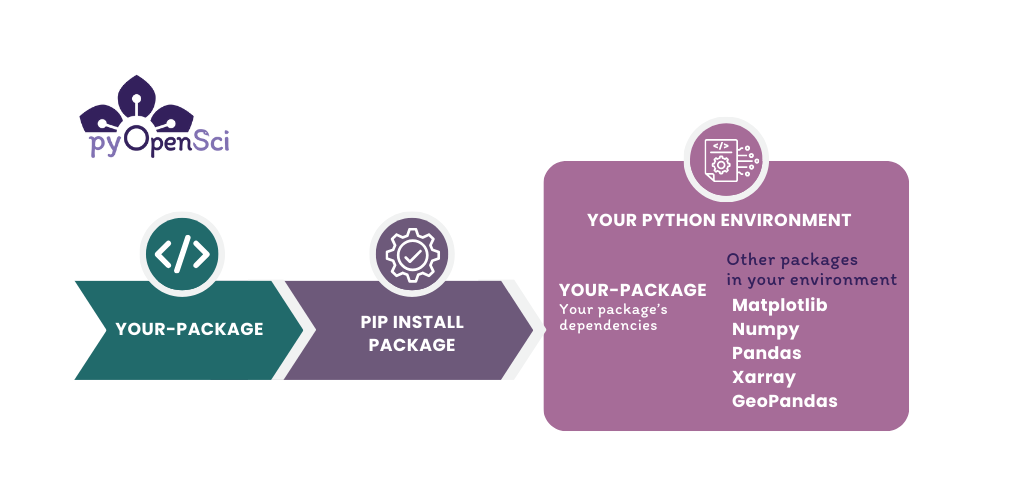
In a previous lesson, you learned what a Python package is. Creating a Python package allows you to install your code into any Python environment on your computer. You can then import it into workflows in the same way that you might import a package such as Pandas or GeoPandas. If you push your code to GitHub or GitLab, you can also install it directly from there. Scroll to the bottom of the page to learn more about the basic elements of a Python package..#
Create your Python package#
Below, you will create a pure Python package using the pyOpenSci copier template. Our template uses Hatch as the default packaging tool. At the bottom of this lesson, you'll learn more about the basics of the Python package directory structure, and associated key files (__init__.py and pyproject.toml).
ステップ1: パッケージのディレクトリ構造を設定する#
シェルまたはお好みのターミナルを開きます。
Use the shell
cdcommand to navigate in your shell to the location where you'd like your package to live. Our template will create the package directory structure for youパッケージの名前を決めてください。 名前は以下のようにします:
スペースがない (必須)
Use all lowercase characters (Recommended). For this tutorial, we will use
pyospackage.Only use letters and the characters _ or - in the name. This means that the name
pyos*packageis not an acceptable name. However, the namespyos_packageorpyos-packageare both OK.
In your terminal, run the command below. This will begin a series of prompts that will ask you questions and help you to customize your Python package.
copier copy gh:pyopensci/pyos-package-template .
After running the command above, the template will walk you through a series of questions.
Note that when you reach the prompt "Do you want to answer one more question, and skip the rest, using the default values?" you can choose Yes, but with a minimal setup to create the most basic version of your package that contains documentation, tests and a example module for you to use.
After this question, the template will ask you for your preferred GitHub username and will then create a package with basic tests, documentation, and GitHub configuration setup for you.
➜ copier copy gh:pyopensci/pyos-package-template .
🎤 "Welcome to the pyOpenSci package template.
Please select the type of template that you want to create today."
 >> MINIMAL: I want a minimal setup (package, tests and docs; typing); linting not included).
    FULL DEFAULT: I want to use the default settings but I want it setup for me.
    FULL CUSTOM: I want it all but I want to fully customize all template elements.
🎤 What is the name of the project? Used as the README.md title, in the
   pyospackage_juno
🎤 Please provide a short description for the package.
    (Finish with 'Alt+Enter' or 'Esc then Enter')
> A great package that adds and subtracts numbers.
🎤 Who is the author of the package? Used in the package description.
   juno dawg
🎤 Provide you or your organization's GitHub username. Used to generate
   pyopensci
The template will then begin to copy files into the directory that used above. (. means current working directory.)
...Copying from template version 0.6.4.1
    create  CODE_OF_CONDUCT.md
    ...The template will continue to copy files...
The final package structure will look like this:
└── .github/ # a hidden directory with templates for github and actions to run your tests
├── CHANGELOG.md
├── CODE_OF_CONDUCT.md
├── CONTRIBUTING.md
├── LICENSE
├── README.md
├── pyproject.toml
└── src/  # This is your package directory where your code lives
└── docs/ # this is where your documentation lives
└── tests/ # Your tests are here
Step 2: Explore the existing module in your package#
A Module refers to a .py file containing the code that you want your
package to access and run. Within the pyospackage subdirectory, you have an
example.py module that you can use to test out your package quickly.
example.pyモジュールのコードには、いくつかの機能があることに注意してください:
これは numpyスタイルのdocstring を持っています。
typing を使用します。
At the top of the module, there is a docstring explaining what the module does.
Python supports different docstring formats. The most popular formats for documenting Python objects are NumPy Style Docstring[2], Google Style Docstring[3], and the Epytext Style Docstrings[4].
pyOpenSciは、NumPyのDocstring規約を使用することを推奨します。
Learn more about docstrings here for an overview of both topics.
def add_num(a: int, b: int) -> int:
    """
    Add two numbers.

    Parameters
    ----------
    a : int
        The first number to be added.
    b : int
        The second number to be added.

    Returns
    -------
    int
        The sum of the two input numbers (a + b).

    Examples
    --------
    >>> add_num(3, 5)
    8
    >>> add_num(-2, 7)
    5
    """
    return a + b
Pythonモジュールと __init__.py ファイル
The word module refers to a .py file containing Python code.
__init__.py は、Pythonがディレクトリに少なくとも1つのモジュールが含まれていることを認識できるようにします。 パッケージは複数のモジュール [5] を持つことができます。
Step 3: Optional -- Add code to your module#
If you want, add a second function to the example.py module. It can be a simple function.
For example, write a second function that multiplies numbers.
Step 4: Check out the metadata in your pyproject.toml file#
A pyproject.toml file stores metadata that provides instructions to various tools interacting with it, including Hatch, which will build your package. You can also specify metadata for your package.
You will learn more about the pyproject.toml format in the
next lesson when you add additional metadata/information to this file.
The metadata in your generated pyproject.toml is already setup for you using the information you provided the copier template above.
TOMLファイルの概要
TOMLフォーマット は表と変数で構成されます。 表は角括弧で示される情報のセクションです:
[this-is-a-table].
Tables can contain variables within them defined by a variable name and an = sign.
For instance, a build-system table most often holds two (2) variables:
requires =, which tells a build tool what tools it needs to install prior to building your package. In this case hatchling.build-backend =、これは、特定のビルドバックエンド名を定義するために使われます、(この例では、hatchling.buildを使用しています)。
# An example of the build-system table which contains two variables - requires and build-backend
[build-system]
requires = ["hatchling"]
build-backend = "hatchling.build"
TOMLはデータ構造を整理し、設定ファイル内の関係を定義します。
Hatchが作成した
pyproject.tomlファイルをお好みのテキストエディタで開いてください。 下の例のようになるはずです。Make sure the package version, package name, and author name look correct. The email is optional.
[project]
name = "pyospackage"
version = "0.1.0"
description = "A small template package that does cool things."
authors = [
    { name = "pyOpenSci", email = "pyopensci@pyopensci.org" },
]
license = "MIT"
readme = {"file" = "README.md", "content-type" = "text/markdown"}
# Please consult https://pypi.org/classifiers/ for a full list.
classifiers = [
    "Development Status :: 2 - Pre-Alpha",
    "Intended Audience :: Science/Research",
    "Operating System :: OS Independent",
    "Programming Language :: Python :: 3 :: Only",
]
# TODO: add keywords
keywords = []
# TODO: add dependencies
dependencies = []

[project.urls]
Homepage = "https://github.com/pyopensci/pyospackage"
"Source Code" = "https://github.com/pyopensci/pyospackage"
"Bug Tracker" = "https://github.com/pyopensci/pyospackage/issues"
Documentation = "https://pyospackage.readthedocs.io"
Download = "https://pypi.org/project/pyospackage/#files"

[project.optional-dependencies]
dev = [
    "hatch",
    "pre-commit",
]
At the bottom of the template-generated pyproject.toml file, you will see a section that defines Hatch environments. We will cover Hatch environments in a later lesson.
pyproject.tomlファイルに最低限必要なもの
The core information that you need in a pyproject.toml file to publish on PyPI is your package's name and the version. However, we suggest that you flesh out your metadata early on in the pyproject.toml file.
Once you have your project metadata in the pyproject.toml file, you will
rarely update it.
ステップ 5: パッケージをローカルにインストールする#
At this point, you should have:
pyproject.tomlファイルをルートに持つプロジェクトのディレクトリ構造空の
__init__.pyファイルを含むパッケージ・ディレクトリとAt least one Python module (e.g.
example.py)
これで Python パッケージをインストール(ビルド)する準備ができました!
While you can do this using Hatch, we will use pip for this lesson, so you can see how to install your tool into your preferred environment.
First, open your preferred shell (Windows users may use something like GitBash) and cd into your project directory if you are not already there.
使用したいPython環境をアクティブにします。
python -m pip install -e .を実行します。
# Activate your environment using conda or venv
# Below we use conda but you can do the same thing with venv!
> conda activate pyosdev
(pyosdev)
> conda info
    active environment : pyosdev
    active env location : /Users/your-path/mambaforge/envs/pyosdev
# Cd into your project directory
> cd pyospackage
# Install your package
> python -m pip install -e .

Obtaining file:///Users/leahawasser/Documents/GitHub/pyos/pyosPackage
  Installing build dependencies ... done
  Checking if build backend supports build_editable ... done
  Getting requirements to build editable ... done

# Check to see if the package is installed
> conda list
# use pip list instead of conda list here if you are working in an venv environment rather than a conda envt
python -m pip install -e . は何をしているのか?
python -m pip install -e . installs your package into the current active
Python environment in editable mode (-e). Installing your package in
editable mode, allows you to work on your code and then test the updates
interactively in your favorite Python interface. One important caveat of editable mode is that every time you update your code, you need to restart Python.
(編集可能モードではなく) 定期的にパッケージをインストールしたい場合は、次のようにします:
python -m pip install .
pip を呼び出す際に python -m を使用する
上記では、 python -m を使用して、現在アクティブな環境にインストールされている pip のバージョンを呼び出します。 python -m は、現在の環境にインストールされているバージョンの pip を呼び出していることを確認するために重要です。
重要: pipはPyPIからパッケージをインストールするためにも使用できます。しかし、この場合、.を使用してローカルフォルダからパッケージをインストールするようpipに指示しています。.の代わりにコンピュータ上のプロジェクトディレクトリへのパスを指定することもできます。.はpipに現在の作業ディレクトリを使用するよう指示します。
あなたの環境でpyospackageを探す#
Once you have installed your package, you can view it in your current
environment. If you are using venv or conda, pip list will return
a list of packages in the current active environment.
Note that because pyospackage is installed in editable mode (-e), pip will show you the directory path to your project's code
$ pip list

➜ pip list
Package                       Version        Editable project location
----------------------------- -------------- --------------------------------------------------------------
...
arrow                         1.2.3
...
...
mamba                         1.1.0
markdown-it-py                2.2.0
MarkupSafe                    2.1.2
matplotlib                    3.7.1
msgpack                       1.0.5
mypy                          1.4.1
nox                           2021.10.1
numpy                         1.24.2
packaging                     23.0
pandas                        1.5.3
pyosPackage                   0.1            /Users/yourusername/path/here/pyosPackage
...
...
...
ステップ 6: 新しいパッケージをテストする#
パッケージをインストールした後、選択したターミナルのコマンドプロンプトで“python”と入力して、アクティブなPython環境でPythonセッションを開始します。パッケージをインストールしたら、選択したターミナルのコマンドプロンプトで "python" と入力し、アクティブなPython環境でPythonセッションを開始します。
You can now import your package and access the add_numbers function.
➜ python
Python 3.11.4 | packaged by conda-forge
Type "help", "copyright", "credits" or "license" for more information.
>>> from pyospackage.example import add_numbers
>>> add_numbers(1, 2)
3
GitHubからパッケージをインストールする
PyPIに公開せずにコードを共有したい場合は、いつでも構文を使ってGitHubから直接パッケージをインストールできます:
python -m pip install git+https://github.com/user/repo.git@branch_or_tag
GitHubのパッケージをインストール可能にするには、次のようにします:
新しいGitHubリポジトリを作成する
上記で作成したプロジェクトディレクトリの内容をGitHubにプッシュします
最後に、上記のコマンドを使ってGitHubからパッケージをインストールします。 上記のコマンドを使用する際は、user、repo、branch_or_tag を特定の値に置き換えることをお忘れなく。
例えば、以下のようにpyOpenSciリポジトリのmainブランチからpyospackageをインストールします。
python -m pip install git+https://github.com/user/repo.git@branch_or_tag
おめでとうございます! あなたは最初のPythonパッケージを作成しました#
You have now created a Python package that you can install into any Python environment.
これからのレッスンでは、あなたは:
READMEファイル と LICENSE をパッケージに追加する。
PyPI での公開をサポートするために
pyproject.tomlファイルにメタデータを追加します。パッケージ配布ファイルをビルド して (sdist と wheel) 、 test PyPI に公開する方法を学びます。
PyPI から conda-forge に公開する方法を学んでください。
Pythonパッケージのディレクトリ構造について#
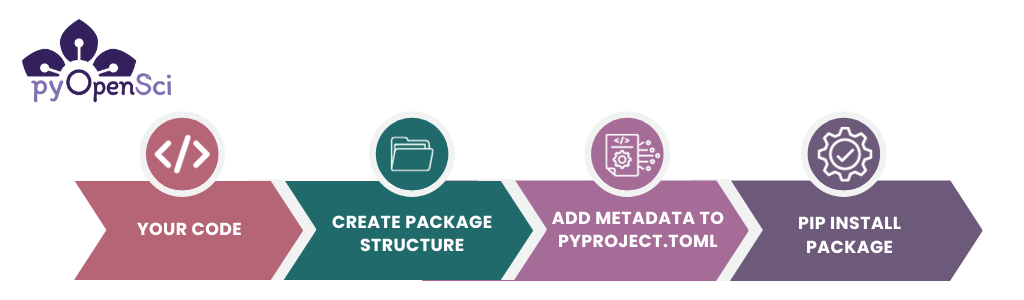
Pythonコードをインストール可能にするには、以下の要素を含む特定のディレクトリ構造を作成する必要があります:
pyproject.tomlファイル。特定のディレクトリ構造。
いくつかのコード。
コードディレクトリの
__init__.pyファイル。
このレッスンで作成するディレクトリ構造は次のようになります:
pyospackage/  # Your project directory
 └─ pyproject.toml
 └─ src/  # The source (src) directory ensures your tests always run on the installed version of your code
    └── pyospackage/  # Package directory where code lives
        ├── __init__.py
        ├── add_numbers.py
        └── # Add any other .py modules that you want here
Once you have the basic items of a Python package (code, metadata and a file structure), you can pip install your package into any Python environment on your computer.#
基本パッケージのディレクトリ構造について#
上記のレイアウトについて、いくつかの点に注目してください:
パッケージのコードは
src/packagenameディレクトリにある。インストールされたバージョンのコードでテストを実行していることを確認するため、src( source code の略)ディレクトリを使用することをお勧めします。srcディレクトリの中にpyospackageというパッケージディレクトリがあります。 ディレクトリ名にはパッケージ名を使用します。 これは、インストール後にPythonコードでパッケージをインポートする際の名前になります。パッケージディレクトリには
__init__.pyファイルと Python モジュールがあります。以下に__init__.pyファイルについて詳しく説明します。pyproject.tomlファイルはパッケージのルートディレクトリにあります。パッケージのルートディレクトリの名前は、パッケージ名である pyospackage です。これは必須ではありませんが、GitHub / GitLabのリポジトリ名とルートディレクトリ名がパッケージ名と同じであることをよく見かけます。
__init__.py ファイルとは何ですか?#
__init__.py ファイルは Python にディレクトリを Python パッケージとして扱うように指示します。 このように、__init__.py ファイルがあるディレクトリは Python に直接インポートすることができます。 Python に認識させるために __init__.py ファイルにコードを記述する必要はありません; 空であることもあります。
例えば、 __init__.py ファイルを持つ上記のファイル構造の例に従って、次のように実行します:
import pyospackage
pyproject.tomlファイルとは何ですか?#
pyproject.toml ファイルは:
プロジェクトのメタデータ (名前、作者、ライセンスなど) を定義します。
依存関係 (依存するパッケージ) を定義します。
パッケージのビルド に使用するビルドバックエンドを指定し、設定します。
__init__.py と pyproject.toml ファイルが追加されたら、pipなどのツールを使ってパッケージをビルドし、インストール可能なPythonパッケージとして配布することができます。 pyproject.toml ファイルには、パッケージをインストールするために、以下のようないくつかの基本的な項目が定義されている必要があることに注意してください:
使用したい
build-backendを指定します、プロジェクトの
nameとversionを指定する。
pyproject.tomlファイルが重要な理由
The pyproject.toml file replaces some of the functionality of both the
setup.py file and setup.cfg files.
If you try to pip install a package with no pyproject.toml, you will get the following error:
GitHub/pyospackage/testme
➜ python -m pip install .
ERROR: Directory '.' is not installable.
Neither 'setup.py' nor 'pyproject.toml' found.
If your project already has a setup.py file, Hatch can be used to automatically create a pyproject.toml.